Saturday, October 29, 2016

Stickeroo Cards

Today I did a bit of cheating to get five cards done using Penny Black Stickeroos. They are beautifully colored stickers and I tried to add them to cards with a bit of extra embellishment or layering to make them appear a bit more handmade. They are so beautiful and the coloring on them is wonderful.


Here is the photo of the stickers I used. Just click on the link. This set is called Berry Delight. But for the life of me I cannot figure out how a pear is a Christmas image. But it was one of the stickers in the set so I figured they knew more then I did. LOL Edited: I found this on the internet so now I understand why it was considered a Christmas symbol. Pear: The pear symbolizes Christ's love for mankind.

And I used a Penny Black sentiment stamp set called Yuletide Wishes. Here is the link for that too. I think these sentiments have the most beautiful font and wonderful verses in them. I just had to have them for my Christmas card designs.


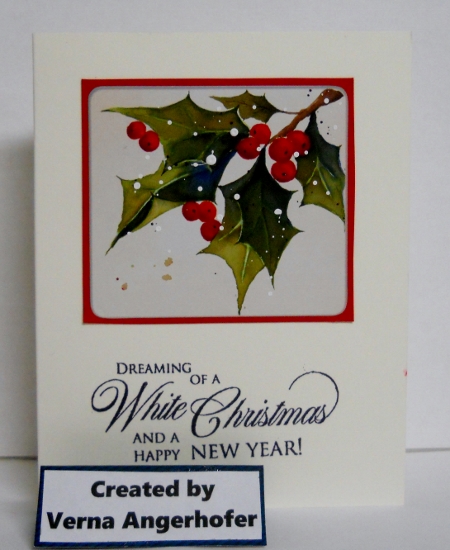
I love the bright colors of these stickers and I knew I would be needing to get lots of cards finished by Thanksgiving or even earlier and so I opted to try this. Some of them I added extra specks of white with acrylic paint mixed with water to simulate snow. Others I just layered onto coordinating card stock. A couple used shimmery copper colored card stock and I added gems and copper nail heads to most of them. So far I have done 15 cards using these stickers and I have one more sheet to work with. I hope you enjoyed looking at them. And, even though I cheated I still think they worked into lovely card designs.

Well, I hope your Saturday was a good one. Ours was a rainy one so that was the reason I got to work on cards once again. It was a fun project too. Have a great rest and a good Sunday my friends. Thanks for stopping by.

God bless,
Verna


Friday, October 28, 2016

Christmas Vest

Another card along the sweater and stocking theme is this one which is using a template using a vest. I really am enjoying the Freebie templates at Stamp TV and making great  use of them along with the wonderful Stamp TV set called Nordic Winter illustrated by Claire Brennan.


I chose to use mainly Ivory, Christmas Pine and Kraft card stock from Gina K. Designs. I also used the Christmas Pine, Black and Red Velvet inks from Gina K. Designs.

I computer printed the vest template onto Ivory card stock and then proceeded to stamp my design on the vest. Once that was done I fussy cut it out and pieced it over the bottom template. I finished the vest by adding some light brown lines around the bottom, neck and sleeves. I then laid this aside while I made my background design.

The background was done with black ink and I stamped the design onto the kraft paper. The card base is of Christmas Pine card stock and onto that base I added the kraft panel. But before I layered it I took some ribbon from the Christmas Collection from Really Reasonable Ribbon and placed that on the left hand side.


I also added a kraft panel inside the card to which I stamped the same border design along the bottom. Kraft is light enough so that the black ink shows well and I love using Kraft on card designs all year long.

Well, this will be entered in the Mix It Up Monday Challenge at Stamp TV. In that challenge we were to use just a pop of red. So my red reindeer design on the vest should make it a qualifying entry.

Well, our sun they said we were to see today so far has not appeared. And, that is bad news for anyone wanting to combine corn. We are in a crunch time frame here too as there are only a few days before hubby has to have his cataract surgery and that means he can't get into a dusty situation and combining is certainly that type of situation. Hopefully, he will be able to finish it before as I know that would be a big relief to both of us.

Well, have a great weekend. It is hard to believe another week has just sped by again. Thanks for always leaving such wonderful comments too. I love them.

God bless,
Verna

Thursday, October 27, 2016

Halloween Treat Bag

My biggest problem with making Halloween Treat bags is that I have to sample the treats while doing so. But I sure enjoyed the treats along with the making of this easy and simple design.


I simply took a sandwich bag and cut off the top and added the treats. Then with Cheery Lynn Designs oval dies I made the topper base with orange card stock layered onto black. Using my Scor Pal I embossed down the middle and folded it over. I stamped the  sentiment on the orange layer with Gina K. Designs black ink. Next I stamped the cat in the moon image onto white card stock with the black ink and colored it in with my Bic Mark-It pens. After fussy cutting out the moon/cat image I added it to the topper. All that was left to do then was to staple it on the treat bag.

Couldn't be easier. And, with limited time these days I am glad it did not take so long.

Cheery Lynn Dies used:
XM-7 Oval Classic
XM-9 Oval Inverted Scallop

Stamp set used:
Sparkle N Sprinkle Plate 00-335P4-HALLOWEEN-RIP

I am entering this in the following challenges:
Mod Squad Blog Challenge-Halloween Fun
Scrapy Land Blog Challenge #52-Halloween

I will spend part of Halloween Day getting a mammogram. I want to remind all of you that this is very important to do even it may not be the most pleasant thing. So check those girls out ladies!

Thanks for stopping in and hope your day is going well.

God bless,
Verna

Sunday, October 23, 2016

Christmas Stocking

I made another clean and simple card using the freebie templates from Claire Brennan which are available at the Stamp TV site. This time I chose to use the stocking template and I used the PDF form to make mine. Simply download the templates to your computer and print them out. I also used the Gina K. Designs Nordic Winter set which is illustrated by Claire. Also on the print out is a pattern for a vest which I might choose to use for another card some time.


The colors I used were Christmas Pine and Red Velvet ink from Gina K. Designs. I also used Christmas Pine and Ivory card stock from Gina K. Designs. The toe, heel and upper part of the stocking were colored with Bic Mark-It pens. Inside the card I added the Ivory panel on which I stamped the border design in the green. I used a brad to fasten the stocking to the sentiment panel.


I sure hope whoever gets this card will hang their stocking up so that Santa can fill it too. I think this is a really cute template and I thank Claire so much for being so gracious as to give the members of Stamp TV this little freebie. I know I am enjoying it very much.

Well, I hope your Sunday went well. I started my day out at church and then this afternoon I was busy writing cards to people and tracking down addresses. But I finally got that task done and that was when I decided to make this card. I really had fun too so my Sunday was a great one.

Thanks for looking and for the wonderful comments.

God bless,
Verna

Saturday, October 22, 2016

Reindeer Sweater

Today I again worked with the free sweater template that Claire Brennan so nicely added to the Freebies section on Stamp TV in SVG and PDF forms. I am a PDF user so it involved some fussy cutting on my part but I just love the wonderful sweater designs one can make using the Gina K. Designs Nordic Winter set illustrated by Claire Brennan. For my card I also used a sentiment from the Gina K. Designs Warm Woolen Mittens set by Rebecca Oehlers. The Warm Woolen Mittens set is no longer available as it is retired.


The sweater design was stamped with Gina K. Designs Red Velvet ink. I think that is the prettiest red ink I have seen in a long time. I had to find a similar color to do the bands on the sweater at the collar and the cuff so I went this time to my Zig water color markers. And over the top of the water color inks I made a ribbed look with an extra fine point Bic Mark-It red pen. I thought about leaving the cuffs and collar white but had no idea how to make the ribs in them so I stuck with the red.

This time I chose to use some plaid pattern paper which reminded me of flannel. I figured it would fit in with the warm wishes design. This  paper is from the Stampin' Up! Warmth & Cheer Designer papers. This pattern paper was added to the Gina K. Designs Red Velvet card stock card base and then over that I added the sweater and the sentiment by popping them up with Zots.


I finished the card by adding a white panel inside on which I had stamped the stitched heart design all along the bottom.

I am entering this in the Double D's Blog Challenge in which they ask people to use plaid in their projects. I think this will qualify.


Well that was a fun project again and it really doesn't take so long once you figure out how to do the design. I remember seeing deer on a lot of Nordic styled sweaters in the past so I figured I would make one on this sweater too. Sure wish I could crochet or knit ones like this for real, but for now this is the way I will make mine.

Well, I hope your Saturday is going well. Thanks for stopping in and for all your wonderful comments.

God bless,
Verna

Friday, October 21, 2016

Sweater Christmas Card

Claire Brennan who is a designer for Gina K. Designs made this wonderful Nordic Winter set and also on Stamp TV gave a freebie template for making a sweater. She made it in Pdf and also in an SVG cut file so no matter who you are if you have a printer you can do it. I am in the Pdf category and so therefore I had to fussy cut the sweater myself. Just check out the Freebies section and it should be there and if not, will be soon. This will be about as close I will ever get to making a sweater as I don't knit and what little crocheting I did know I have already forgotten.


I used a Gina K. Designs Red Velvet card base and also stamped the saying in the Red Velvet ink before I embossed the white panel with a Stampin' Up! embossing folder which is made by Sizzix. It is called Cable Knit Dynamic Textured Impressions. I am telling you that is one thick folder and I had to crank my Crossover way to No. 18 in order to run it through but as you can see it sure makes for a lovely embossed design. The sentiment is one from the Gina K. Designs Holly Jolly stamp set which is a freebie incentive with a qualifying order.

The sweater design was stamped with Turquoise Sea ink and then it was pieced onto the base sweater image. I found a Bic Mark-It pen which was a close match to that color of ink and I hand drew the collar and cuffs for the sweater. I am not too proficient in drawing but this seemed to be a pretty simple task even for me. LOL Once I had it cut out I popped it up with Zots over the embossed background.


I added a white panel inside the card too, but  before I did that I stamped a row of that pretty pattern along the bottom of it.

This was an all afternoon project and I was not totally sure how to do it but my first attempt seems to not look too bad. At least it is one template I will use again I am sure.

The sun was supposed to shine but it pretty much eluded us all day. Of course, last night as I looked out the window I could see stars. Then a little while into about the 9 o'clock hour this morning it clouded up again.  And, that wind sure does make it feel cold. Brrrr! I hate to think of winter. I already ache with the changing of the seasons. So I hope once we get into one weather pattern instead of this up and down one I will not have so many aches and pains.

Well, thanks for looking at my sweater card and for the lovely comments you always leave.

God bless,
Verna

Wednesday, October 19, 2016

More Frosty The Snowman

I stamped out several of the images from the Heartfelt Creations Frolicking Frosty stamp set and this afternoon I made another card. This time I used the whole image with this particular Frosty. And, I love how this one looks too.


Now you have to admit that is one cute snowman. I can see him greeting all the people as they pass by. And, he is ready to decorate the tree too it seems.

I stamped him first on white card stock and then colored him in with my Bic Mark-It pens. It seems lately I am always grabbing those markers as I love how they color. I also sponged on some blue for the sky and a little bit of shadow below Frosty in the snow line.

This focal panel was then ready to add to a couple layers of card stock which were die cut with the Memory Box Cross Stitched Frame Border dies. For those layers I chose colors that sort of complimented the colors of some the ornaments. Once all was layered I added it to the white card base.


I also stamped some of the Heartfelt Creations snowflakes from the Snow Kissed Spruce set inside the card. And, on the outside of the card I added snowflakes from the Fri-Dies Funky Flakes set to which I painted on Wink of Stella. I also added a iridescent rhinestone gem to each. Those gems reflect back in the colors on the card.


The final step was to add some Wink of Stella to Frosty and also to the snow and ornaments. I know it is hard to see in the other photos but I am hoping this last photo will show a bit of the sparkle.


Well, I could not find a challenge that this would work for today so this is just another one I am doing for the fun of it.

Oh, and on a side note today is me and my hubby's 47th wedding anniversary. I don't think we will celebrate today unless it should rain. It is corn harvest season. I learned as a new bride early on that farming would always come before any celebration. In fact, we cut our honeymoon to the Black Hills short by two days so he could get back home to do the corn harvest. But we will eventually get it in and have a meal out. But my sweetie did remember me with a card and we shared a few kisses too before he went outside to do his farming thing!

Well, it has been dreary all day but so far not rained. We had thought the forecast said for sunshine but it eluded us all day long. Now it is almost 6 o'clock in the evening and the temps are falling once again. I guess it is time for me to see what I can burn for supper. LOL Have a good night everyone and thanks for the lovely comments you leave me always.

God bless,
Verna

Tuesday, October 18, 2016

Frosty the Snowman

I indulged in some fun today and worked with my Heartfelt Creations sets I had purchased shortly before I had surgery and never got to work with them until now. I really like the cute snowman stamps, trees and dies that go with them. For this card I chose to just die cut the snowman out and not use the whole stamp image. That is what is nice about this set. It is very versatile.


I first took a white card base and sponged on the blue for my sky and used a mask to create a snowline. Then I stamped the trees on using my MISTI so that I got great impressions.

I stamped the snowman image but since I only wanted the snowman himself, I die cut him out from the design. Then I colored him in. He was then popped up on the card so as to give him a bit more dimension.


I also added some snowflakes on the outside of the card and inside. And, the sentiment is taken from the Heartfelt Creations Holly Berry set as it was the only Heartfelt Creations sentiment I had for a Christmas card. And, I think it works wonderfully.


I colored the snowman in with my Bic Mark-It pens. And, the blue sky that I sponged on the base card was Gina K. Designs dye ink.

Heartfelt Creations stamp sets used:
Holly Berry Set
Frolicking Frosty
Snow Kissed Spruce

Heartfelt Creations Die Set:
Frolicking Frosty and Spruce

This was a "just for fun" card and I am not entering it in any challenge. I got three different cards done with the set so far and will no doubt be making more too! I don't get much accomplished though with us working on the corn harvest too. So any chance I get I try to get a card or two done.

Thanks for looking and hope you are having a wonderful evening.

God bless,
Verna

Sunday, October 16, 2016

Spooky Tree

I think I have enough Halloween cards done now so I will post this last one that I made. It uses both stamps and die cuts. I hope I counted right as I need to concentrate on other types of cards.


My first step was to sponge ink onto the Ivory card stock to make the background for my little scene. Next I added the die cut tree image. I had previously sponged Fall colors of ink onto card stock so I took that and cut out a lot of leaves using the Flourish Leaf Strip. I then fussy cut them apart and laid them aside.

Now was the sponging of ink onto the pumpkin and I also added some sponged paper behind it to create the darker rust look for the mouth, nose and eyes. This was placed over the base of the tree.


Now the basics of my scene were pretty much in place and all I had to do was add all the leaves. I glued them here and there around the pumpkin and also added a few falling from the bare tree.


I finished the card then by stamping the bats flying around the tree and also gluing on the die cut Happy Halloween sentiment.


And that completes my Halloween scene. I had forgotten I had that spooky looking tree die until I ran across it accidentally. So I just had to make one card with it in it.

Cheery Lynn Designs Dies:
Flourish Leaf Strip B178
Happy Halloween Twiggy Wreath B469 (sentiment only)
Jack-O'-Lanterns B594 (set of three) but I used only one.

Diemond Die: Bare Tree

Other Supplies:
Bat-Printworks
Gina K. Designs Inks
Sponge Daubers
Ivory Card Stock (Gina K. Designs)
Scor Board
Two Way Glue Pen

I am entering this in the following challenges:
Cheery Lynn Designs Challenge #240-Halloween
Scrapy Land Blog Challenge #51-Anythng Goes

Thanks for all the wonderful comments you leave each time I post a card. I truly appreciate each and every one of them. I hope your week will be a great one.

God bless,
Verna

Saturday, October 15, 2016

Wood Grain Christmas

I just had to participate in a Gina K. Designs release challenge in which we were to use a wood grain background for a Christmas card. And, I had so much fun again and this version uses a wood grain design with an embossing folder as well.


First I took an Ivory card stock sized 4 x 5 1/2 inches and scored it with half inch increments. My next step for the wood grain was to take the Gina K. Designs Kraft dye ink pad and run that flat along the whole panel. Next I then took the Gina K. Designs Christmas Pine dye ink pad and went over the top of the Kraft ink.

Now I was ready to put it in the Holly embossing folder by Cuttlebug and make the embossed design. When that was done the final step for the wood grain background was to take the Gina K. Designs Ivory pigment ink pad and by laying it flat go down the panel to bring out the embossing. The pigment ink was a bit wet so I took a paper towel and rubbed it to dry it off somewhat but you could also let it air dry or use a heat gun. I was in a hurry and the paper towel was handy.

The cardinal image and sentiment from the Gina K. Designs Peace and Joy stamp set were added to Ivory card stock too. I stamped them with Gina K. Designs black dye ink and then colored them with my Bic Mark-It pens, I also sponged on a little bit of Memento Summer Sky to create a blue sky on my scene. The image was then die cut with a Die-Namic My Favorite Things Wonky Stitched Oval die. And, the outer Red Velvet layer was cut with a Cheery Lynn Designs Classic Oval die.

I added a ribbon to the wood grain background and then placed that on a Red Velvet card base. Over the ribbon I popped up the cardinal image. Next I took some of the red glitter paper residue I had laying around from the ornaments I did earlier in the week and used that as bling on the card. My card was then finished by adding an Ivory panel inside on which I stamped some holly and the sentiment.


Supplies used:
Gina K. Designs Card Stock
Die-Namics MFT Wonky Stitched Oval Die
Cheery Lynn Designs Classic Oval Die
Gina K. Designs Peace and Joy Set
Gina K. Designs Ink
Memento Ink
Zots Glue Dots
Crafter's Companion Glue Pen
Ribbon-Unknown
Stampin' Up! Red Glitter Paper
Bic Mark-It Pens
Cuttlebug Holly Embossing Folder
2-Way Glue Pen (added glitter bits)
Tweezer (added glitter bits)

I am entering this in the following challenges:
Crop Stop Linky Party #21-Anything Goes
Scrapy Land Challenge #51-Anything Goes

Thanks for stopping by. We have a wedding reception to attend later today so that will be a fun event I am sure too. I hope you have a great weekend.

God bless,
Verna

Friday, October 14, 2016

Back To Halloween Cards

This Halloween card was made with a variety of die cuts and some stamping too. And, some of the dies I used were not really meant to be used the way I did use them, but for me it worked. I hope you like what I did as well.


For some reason I liked the way the spring green card stock looked with the purple, orange and brown colors and then adding black to it really looked great too.


And I used dies from lots of different companies and perhaps you noticed that I do have a really fancy spider web. It was not meant for that I am sure but I thought it would work as I did not have a spider web die in my supply. Also I only used two of the cats in the die set by cutting off the other ones.


Stamps used:
Bat-Printworks
Spider-Frogs Whiskers

Dies used:
Creative Expressions die by Sue Wilson-French Collection-Spider Web
Die-Namics: MFT-843 Wonky Stitched Oval
Cheery Lynn Designs Dies:
Happy Halloween Twiggy Wreath B469-sentiment only
Oval-Classic XM-7
Kitty Kitty-Meow Meow B417-only used a portion
Jack-O'-Lanterns B594 Set of Three (I used only one.)

Other Supplies:
Scor Board
Scor Tape
Gina K. Designs inks for sponging on pumpkin and sentiment and stamping
Sponge Daubers
2-Way Glue Pen
Gina K. Designs card stock

I am entering this in the following challenges:
Scrapy Land Blog Challenge #51-Anything Goes
Crop Stop Linky Party #21-Anything Goes
Cheery Lynn Designs Blog Challenge-Halloween
Double D's Blog Challenge-Pumpkins

Well, I am not sure if I will do any more this week or not. But I sure enjoyed all the creative crafting I did the last couple days. Thanks for coming by and for all the wonderful comments.

God bless,
Verna


Thursday, October 13, 2016

Ornament No. 3

Wow! A third post for today. What was I thinking? But they all involve the ornaments I made with the glitter paper from Stampin' Up! I had some negatives that I thought would work into great ornaments too, so that is what I did. I used them for this design.


In the first ornament I made I needed a red snowflake design so I took the negatives from the red frame dies and tried my best to center that snowflake right in the middle. It worked great. I did that for both of the red glitter paper negatives so that I could once again make a two sided ornament. And, I simply glued two gold circles together and placed them in between these snowflake die cut circles. Now this was four layers so it was too hard to use a regular paper punch to make a hole so I instead got out my old eyelet setter and a hammer and added my punched hole that way. The ornament was finished by adding a green rhinestone gem to the center.

Hopefully, you can see the design better with this next photo. And, believe me taking photos of glittery objects can be a real hassle. But I finally got a couple good ones. The gold layer is recessed behind the die cut snowflakes.


Dies used:
Die-Namics MFT-948 Single Stitched Line Circle Frames
CAS-UAL FRIDAYS Fri-Dies Funky Flakes

I am entering this ornament design in the following challenges:
Mod Squad Blog Challenge-ABC-Anything But a Card
Crop Stop Linky Party #21-Anything Goes

Well, that is all for me today. Tomorrow I will get back to Halloween or Thanksgiving card making, but this was sure fun to work with these. I hope you had a great day too.

God bless,
Verna

Ornament 2

This is my second post of the day. Again I made an ornament with dies and the glitter paper from Stampin' Up!


I had these leftover gold glittery rings that were not used by me in a third ornament I created so this is what I did with them. I also die cut two snowflakes with the red glitter paper and just had gotten them adjusted and glued together when hubby came in and wanted me to take him to the field. So I left my snowflakes and when I came back home here they had separated and had a white shadow showing. I was a tad disappointed but decided that I would leave them that way and adjust my design a little bit and include some white.


I guess the shadow doesn't look so bad. And, I added a white pearl on each side as when this is hanging the center snowflake sort of twirls around. The design is seen from all the directions then. The frames are supposed to show a stitched line but with all that glitter it doesn't show up that well.

Dies used were:
Die-Namics MFT-948 Single Stitched Line Circle Frames
CAS-UAL FRIDAYS Funky Flakes from the Fri-Dies Designs

I am entering this in the following challenges:
Mod Squad Blog Challenge-ABC-Anything But a Card
Linky Party #21-Anything Goes

It feels so good to be doing a bit of crafting again and this is a great reprieve from making cards. I hope you are liking my projects of late. Have a great day!

God bless,
Verna

First Ornament Design for 2016


Sorry I have been missing in action but the carrot crop needed my attention so I was busy for two days freezing carrots. I also kept about 4 lbs. in the freshener drawer of the refrigerator so I could have carrot sticks and salad made with them now and then. I put 22 pints in the freezer.

But yesterday I decided to make an ornament design and I used dies for this project and lots of glitter papers from Stampin' Up!


Dies used were the Spellbinder Lacey Circle die, Die-Namics MFT Single Stitched Line Circle Frames and the snowflake is from CAS-UAL FRIDAYS Funky Flakes. Also in the center of the ornament before I added the snowflake die I stamped one of the snowflakes in the CAS-UAL FRIDAYS Bring on the Snowflakes set. The ornament was finished by adding a green rhinestone gem. The other side looks just the same too so if it twirls around on the tree one can still see the pretty design.

I just love the look of that glitter paper and I wish I had a lot more colors of it then I do. It cuts so easy with the dies too, which really surprised me.

Well, not sure if I will get another ornament done or not. This one I am entering in the following challenges:

Mod Squad Blog Challenge-ABC Anythng But a Card
Crop Stop Linky Party 21-Anything Goes

Thanks for stopping in and for all the wonderful comments.

God bless,
Verna

Friday, October 7, 2016

Halloween

This card used only dies from Cheery Lynn Designs. I had previously cut out a bunch and so today I used them to create my card.


I have no idea who made the pattern paper as I picked that up when a store was going out of business.

And, I don't know who I can give the credit to for using a rubber stamp with their name on it in place of a watermark but I thought it a great idea as I don't know how to add one to my cards with the photo setup I am using. So whoever you are I thank you. I hope to get one made with my whole name on it for a use such as this.

The Cheery Lynn Dies used:
Happy Halloween Twiggy Wreath D469
Flourish Leaf Strip B178
Jack-O'-Lanterns B594

I am entering this in the following challenges:
Mod Squad Blog Challenge-Birds
Double D's Blog Challenge-Pumpkins
Dies R Us Challenge-Leaves
Cheery Lynn Designs-Anything Goes
Scrapy Land Challenge-Anything Goes

Sorry this post is so short but I have to get back to some other tasks. I hope your day is going great and last night we had our first freeze of the season. Today is a crisp day but at least the sun is out.

Have a great evening.
God bless,
Verna

Thursday, October 6, 2016

Using a Stencil

Well, I am starting over it seems with this post. I was nearly all done when "whoosh" just like that the whole post disappeared. Apparently I hit a wrong key and it was history. So I will try again. LOL

Using a stencil I made two cards from the background I created. The first is a regular A2 size card and the next one is a tag card. Here is the first one.

Card One


The last card I did for World Card Making Day used a stencil to make a background. I used images from Gina K. Designs Grateful Heart stamp set and a stencil from Stampinback called Circles 1. My panel base was ivory card stock and when the stencil was placed over it I sponged on the colors of Autumn using Gina K. Designs inks. To this card panel then I stamped the leaves images randomly in dark brown ink. The last things I added were a layer of brown card stock under it, a ribbon and the sentiment before I added it to the base card of Prickly Pear card stock.

Tag Card

Yesterday using more of the stenciled paper I then made a tag card using stamps from the Stamplorations Coffee Happy set and the Luggage Tag set from Cutplorations. I was inspired by the colors of the photo they displayed on the challenge post.


The die set has tags of varied sizes so the largest one is the base of the card and from there I added die cuts of the next sizes with the smallest one having the stamped designs on it. The sentiment came as a straight line one but since it was a clear stamp I shaped it and placed it that way on an acrylic block so that it would fit nicely around the stacked cups image. I used Bic Mark-It pens to color the cups. The last things I did to the card was to add a ribbon, some gems and an inside layer of ivory card stock.

This tag card will be entered in the October 2016 Cutplorations Challenge and the Stamplorations Never-Ending Anything Goes Challenge.

Well, the rest of the day will be keeping me busy working with apples as I was gifted quite a few so I plan to fill my freezer with some apples for future use. I doubt I will bake anything with them at this time though.

Thanks for all your wonderful comments and I hope you enjoy this beautiful Autumn day.

God bless,
Verna

Wednesday, October 5, 2016

Non-Traditional Christmas Card

This was the third challenge at Stamp TV for World Card Making Day. A non-traditional Christmas card was to be the theme. I found this one to be the most easy for me to do too. I went with a single layer card but tried to make it look like there was a lot going on in the scene.


I started with a kraft card stock base. And, I first made a circle mask and used the negative to place over the area where I wanted the moon and then sponged that in with Gina K. Designs Ivory pigment ink. When that was done I placed the positive over the top of the moon so that I could sponge around it with Gina K. Designs Kraft and Warm Cocoa dye inks. I also made a mask to make the snow line and on the bottom I sponged on more Ivory ink.

I now had the basics done for the scene and only had to add in the filler stamps. I chose to add the Santa and Reindeer image  with Dark Chocolate dye ink and show them flying over the moon. Next I took the tree image from the Gina K. Designs Christmas Wishes set and stamped that three times also in Dark Chocolate. The sentiment from that set was also used and to kick it up a notch I stamped that in Gina K. Designs Red Velvet ink.

The final touch to the card was to add some clear rhinestone gems to make it look like some stars in the sky to go with that nice round moon.

This was such a relaxing card to make. I always enjoy sponging and find it to be very therapeutic in fact. I hope you like my non-traditional Christmas card.

Have a great day!

God bless,
Verna

Foiling

Foiling was the second challenge at Stamp TV for World Card Making Day and I was not sure it would be something I would be able to do as I did not have a printer or a heat source that would work for it. But I had to try.


I used a pre-printed sentiment design with a heart on it that was supposed to work with foiling that came in a Stamp TV kit. So since I had picked up a small sample of 3 x 3 inch pieces of foiling tissue in the bargain bin I thought I would first try it with an iron. Well, that failed as it scorched the paper but did not add the foil to the black portions of the design.

My next attempt was to try a glue pen and I did not let the glue dry long enough so that ruined another one. But I thought it through and decided to retry this method and let the glue dry longer and then try and rub the foil onto the glued area. This time I only added glue to the heart portion and while I did the dishes and a few other things it was drying. It did work much better and at least most of the heart was covered. So I took a black fine point Bic marker and filled in the areas with black ink to give the heart a more mottled look. But I feared that since this was only a temporary gluing that it might come off again, so I took a Versamark clear ink pad and went all over the circle medallion and added clear embossing powder to give another coat of reassurance to it. LOL


I used the stamps from the Gina K. Designs Made With Love set. And I used Gina K. Design dye inks for all of the stamped images. In case you have issues reading the sentiment it says Happy Birthday all around the circle. I added a red glitter ribbon over the panel and over that mounted the foiled circle which I also layered to white and then to green card stock. And my base card was black. The final touch was to add some black rhinestones to the designed panel.


I tell you not only did this card take me a long time as I had to work so much with getting that wee bit of foiling added, but also taking a photo of foiled images was a pain too! I think I took over 25 photos and these were the best of the lot. By the time I got the photos chosen I was very much out of the mood for any more card making that night.

Well, I will show more of my World Card Making Day cards in future posts. It was a challenge I did enjoy but  this I think was the most challenging one for me to do. Thanks for stopping in and I hope to see you again tomorrow. With rainy days one never knows if the internet will work right or not but if it does I will be back. Have a great day!

God bless,
Verna

Tuesday, October 4, 2016

Carved Wood

After I saw that Gina K. at Stamp TV had posted a video of this new technique called Carved Wood I knew I would have to give it a try too. I just love the look and I can see this being used a lot for future cards.


To make the carved wood design you first score the lines in the card stock. I started with ivory card stock and after I had it scored I ran Kraft ink over the lines and then took the Dark Chocolate over the top of that. Next I put the panel in an embossing folder and got the impression. The last step was to take my Ivory ink pad and run over the embossed area and when you do that the carved look just pops out.


The pumpkin and sunflower image and the sentiment are from the Gina K. Designs Always Autumn set which is illustrated by Theresa Momber. I really love that set and have used it many times.


I added a ribbon to the focal panel and over that I popped the sentiment. This panel was then added to a base card of Dark Chocolate card stock. I added an ivory panel inside as well.

I enjoyed making this card and I hope you liked what you saw too! Have a great evening.

God bless,
Verna

Monday, October 3, 2016

Fall Shadow Play


october2016_altenewinspiraitonchallenge_sveta
A new stamp set from Altenew prompted me to get inky again yesterday and I am really liking how it is so easy to do a shadow in a scene with these stamps. I made mine into a Fall themed card since this is the season we are enjoying now.


I think this fits the Altenew 2016 Fall Inspiration Challenge photo and also the Penny Black and More challenge too.  Both feature the beautiful colors of Autumn. I stamped the images from the set with Tuxedo Black Memento ink except for the shadows which were stamped with Memento Gray Flannel. Other Memento inks sponged onto the card scene were Dandelion, Bamboo Leaves and Summer Sky. The images were colored in with Bic Ultra Fine Mark-It pens. I also used a black marker to add extra leaves falling from the tree by hand drawing them.


The sentiment was stamped with Tuxedo Black onto ivory card stock and I used a circle die to cut it out. I also die cut a circle of the pattern paper that was the same as the border of the main panel and then layered them together before popping them up on the card. My base card was made with ivory card stock. All card stock used is from Gina K. Designs as is the pattern paper.


The last things I did for my card was to add some die cut leaves over the sentiment, an eye in the bird with a white gel pen and some little rhinestones in the upper right corner of the card.


Supplies Used:
Altenew Shadow Play stamp set
Cheery Lynn Dies: 
Card Maker's Stacker's Nesting Dies A2 size rectangle ST 014, Stacker's Nesting Dies Circle-Classic XM-4, and Flourish Leaf Strip B178.
Memento Inks
Gina K. Designs-Card Stock and Pattern Paper
Zots Pop Dots
Bic Mark-It Pens
Crafter's Companion Glue Pen
Scor Board

I am also entering this in the following challenges:

Thanks for stopping in and for all the comments. It is a beautiful Autumn day again and I am loving the crisp but still sunny days. But it sounds like a rainy pattern is moving in again, so I best enjoy the sun while I can. Take care all of you.

God bless,
Verna


Fluttering By

 First of all I want to wish all my Canadian friends a Happy Canada Day! I hope your day is extra special. This card I am showing uses an Al...