Tuesday, January 31, 2017

National Bubble Wrap Appreciation Day

Part of Darnell's NBUS challenge (Never Before Used Schtuff) this week was to do a card using a design that would represent a special day in the year. Well, Darnell chose to do National Bubble Wrap Appreciation Day for her card so I decided I would do the same. But I chose to  use some big bubbles which came with an order from Gina K. Designs. And, for the first time I am using a new set of stamps which was a collaboration between Gina K. Designs and Unity Stamps called You Had Me At Hello.


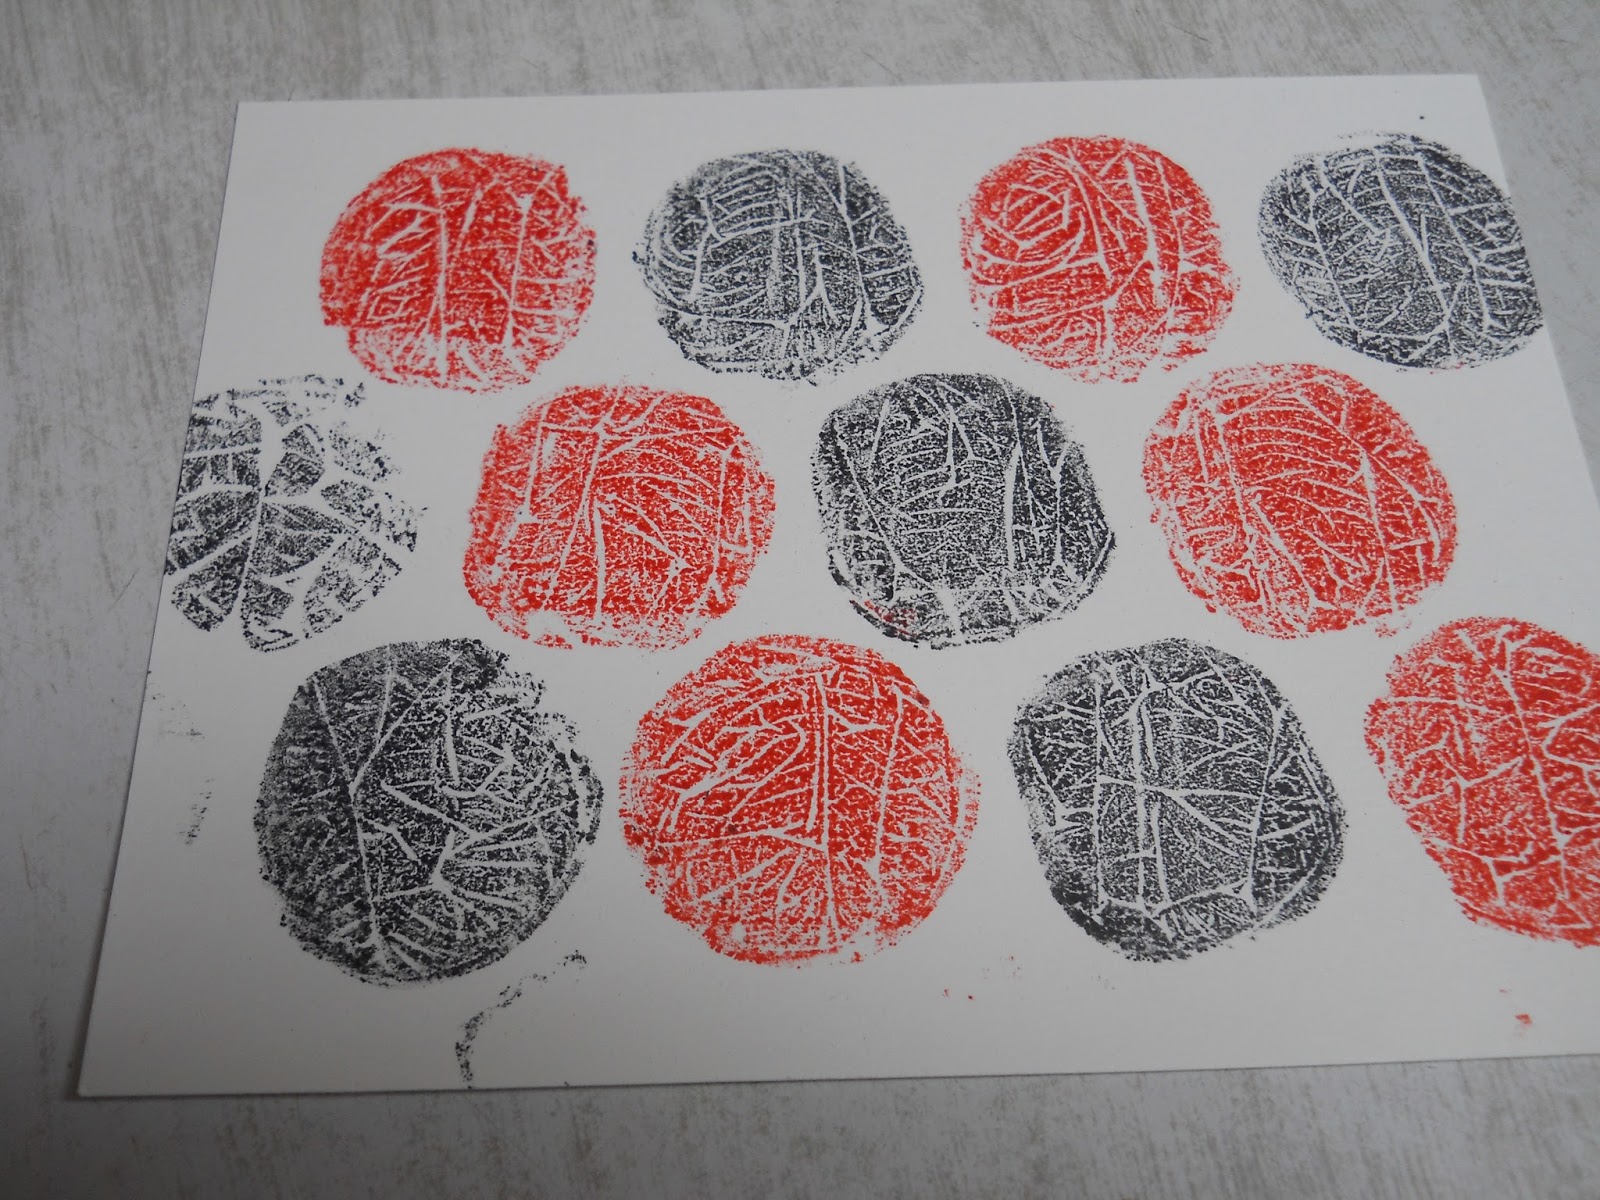
The bubble wrap was sticky on one side so I simply adhered it to an acrylic block and then added the colors of my ink using Gina K. Designs Black and Red Velvet inks. It was then ready to stamp the design.


Here is the background I made with those big bubbles. And, I used the mini ink cubes so that I could do each diagonal line with different colors.


This background was cut down to the size I wanted and then I added it to a layer of Red Velvet card stock. I used a red ribbon with white dots and over it added a black and white gingham ribbon and added this combination to the layer design. I then fastened this panel to the white card stock base.

On a separate piece of white card stock I stamped the heart image with Red Velvet ink and then added the sentiment inside that with the black ink. This was then fussy cut and popped up over the ribbons. The last step for the card was to add some red and black rhinestones.


I hope you used this type of a challenge to use some of that NBUS elements you have in your stash too. I know it has been an inspiration to me to get more things inky.

Well, I am so happy to be able to post my photos. Although I cannot find the program I was using before so I could not resize them. Perhaps one of these days I might find a solution for that too. Until next time take care and thanks for the wonderful comments.

God bless,
Verna

Computer is back!

Well, I got the computer back and I am finding things are throwing me a learning curve with a different email program and everything else seems to be different too, so I am going to be giving my brain some exercise in the next few days and weeks. LOL But at least I think I can show you my card that was made with the Stampin' Up! Wetlands set. I purchased this set quite awhile ago as I love the images so figured it was high time to ink it up.


And forgive me for all the nonsense posts I made trying to use the iPad.  Now I know for sure that will never be an option and for me there is nothing like a computer.

The computer did not cost a lot to fix and clean it up. So maybe it will function better in the long run. Just like us, now and then they need a little check up. In fact, tomorrow that is what is happening with me. Six month checkup. Nothing serious, just to make sure all is functioning as well as can be. I wish a little cleaning up would help me go faster too! LOL

Well, take care and I am so happy with my computer again. You have a great day! And, thanks for stopping in and for all the help and encouragement when I tried to post this card before.

God bless,
Verna

Sunday, January 29, 2017

Someone suggested this.

I will see if this works for the Stampin Up Wetlands card.


Now can you see it?

God bless, Verna

Saturday, January 28, 2017

Failed

I tried making a post from my iPad with a photo but I was not successful and I apologize for that first and no doubt last attempt. I miss my computer. LOL

But I wish you a great weekend.

God bless,Verna

Thursday, January 26, 2017

Butterfly Valentine

Another new item I got from my Tupelo Designs LLC shipment was the lovely Hero Arts Color Layering Butterflies set. Wow! I am loving how these look when finished. And, I had so much fun making one butterfly that I had to add more in different color combinations. To make it a bit more like a valentine I added some fluttering hearts as well. They are from another set which is called Prayers SRHA15 and is from Simon Says Stamps/Hero Arts.


This is a one layer card. And, I found it really easy to do as I used my MISTI to align the stamps correctly. And I think I like the blue one best but all are beautiful. I am very happy with how this turned out.

I am entering this in the Mod Squad Blog Challenge for this week in which we are to use love/valentine type cards. Also I am entering it in the Simon Says Stamps Wednesday Challenge-Anything Goes. Another challenge this fits is A2Zscrapbooking Blog Challenge as I used Hero Arts products.

This will be one that will also be sent to a friend in a nursing home. I think a design like this works for any gender or age too!

Well, I might be missing in action for a while. My computer needs some attention and I only will have my iPad to work with. I have never used that to post on my blog so not sure I could get it to work. And, I imagine I would have to use the iPad to take the photos as well in order to upload them from it. If nothing else, I will have to wait until the computer is back home. I am hoping it is an easy and quick fix but one never knows.

In the meantime I wish all of you great days ahead. Thanks for stopping in.

God bless,
Verna

Wednesday, January 25, 2017

Happy Mail

Yes, today was a good one as I did get some wonderful deliveries today from Tupelo Designs LLC and among the goodies was this cute mailbox die from Die-Namics. So naturally I was anxious to play with it and that is why you are seeing this card I am posting. I decided it would work perfectly for a simple Valentine for friends.


I first took a piece of Tim Holtz water color paper and added some light blue to it. I am not much of a water color person but I can at least make a panel I think. LOL When it was dry I then die cut it with a Memory Box Cross Stitched Frame Border Die.

The next step was to die cut the mailbox image. The mailbox was done with gray colors, the post with brown, the letters with white, the grass with green and the hearts and mailbox flag with red card stock. When I had assembled it to my satisfaction I then added all the elements to the water colored background.

I then added some striped pattern paper to an A2 size white card base. I was going to just mount this completed panel right onto it, but decided it would look better with a red layer so I added that. I also added a "hello" sentiment with black ink to the mailbox.

I just love this red, white and blue design....some of my favorite colors together. And, I think it makes for a nice little Valentine design as well.

Dies used:
Die-namics MFT-1034 Mailbox
Memory Box Cross Stitched Frame Border

Other Supplies:
Sentiment Stamp: A Jillian Vance Design Simply Said: Happy Daisy set
Striped Pattern Paper-unknown
Crafter's Companion Glue Pen
2-way Glue Pen
Cardstock-Various Companies

Since this was a NBUS item again I will be entering this into the second phase of Darnell's NBUS Challenge #9. 


I am also entering this in the following challenges:

Well, almost time to work on the evening meal. We dodged the snow that a lot of the state got, but we might get some flurries tonight. I know it has been windy and cooler today. Well, take care and thanks again for your visits.

God bless,
Verna

Tuesday, January 24, 2017

Steganography

What? You said what? This word in the title of my post was new to me but it was explained this way. It is the practice of concealing a file, message, image or video within another file, message, image or video. And, that was one technique I had to try. It was very difficult for me as I think I chose a die cut message that was to technically designed and I had to do a lot of inlaying on it. But none the less I did use that in this card and even though it doesn't look the greatest I will show you anyway.


Not only did I used a new die but I also used a new stamp set that I had purchased and never put it to use. So this qualifies for Darnell's NBUS Challenge. The die is a Happy Anniversary one from Tonics  Studio and the stamp set is one from A Jillian Vance Design called Simply Said: Happy Daisy.


First I stamped my design repeatedly with Memento Tuxedo Black onto white card stock and then colored the design with my Copic markers.

Next I took a Memory Box Cross Stitched Frame Border die and made my layer from this stamped pattern paper. I was then ready to die cut the hidden Happy Anniversary verse. Now since this required so much inlaid pieces I decided against doing another layer underneath. It would have involved too much piecing but I still think it works for a hidden design.

Much of South Dakota is getting snow but so far we have not gotten any. Maybe later on tonight.  We might wake up to 2-4 inches they said.

Well, another day gone by again. It seems I mostly only get one card done each day. Always other things to occupy my time. But I guess even so, better to go at a snail pace then rush and not get as good a work.

Thanks for stopping by. I love your comments.

God bless,
Verna

Monday, January 23, 2017

Eggs-traordinary

Another wonderful set that has eggs as the main focal design from Sparkle N Sprinkle. My sister-in-law raises chickens and she gets the most colorful eggs from them. So my eggs are the colors that she often collects each day. And, when they need someone to do their chores while they are gone away we often do them in exchange for some eggs.


Usually we get an assortment of light green, white, brown and sometimes almost a light blue egg. So I colored my eggs with lots of different colors too! The design was originally stamped with Memento Tuxedo Black ink on white card stock and then I colored the image in with my Copics. I also used the Copics to color in a light blue all around the design. The Sparkle and Sprinkle stamp set I used is Eggs-traordinary Kindness #825.


I die cut the image out with a Die-namics MFT-843 Wonky Stitched Oval die. I then placed it onto plaid pattern paper from My Favorite Things.The base card is white card stock and I covered the front of it completely with the pattern paper. The sentiment is one I got off an older retired Sparkle N Sprinkle set as I want this to be a birthday card.

This is the first time this set of stamps has seen an inking so this is in the category of NBUS for sure. So with that in mind I will be entering this in Darnell's 2nd Week NBUS challenge.  I did not follow the theme this time as it was optional but I might try to do one using her theme later on.


Well, another day in the new week is almost done. Before I know it the week will be over again. But I guess that is why they say time flies when you are having fun. And, this my friends was indeed fun to do. I hope you are having a great day as well. Thanks for all the wonderful comments too.

God bless,
Verna

Sunday, January 22, 2017

Milton The Friendly Giraffe

Another wonderful stamp set from Sparkle N Sprinkle features the cutest giraffe image I have seen in a long time. I love the sentiments on the set too and can see this as a card of inspiration for someone graduating, starting a new job or beginning any kind of adventure in their life. And, I can also see this image for a baby card or a birthday card image especially for a little boy. The set is called Milton the Friendly Giraffe #817.


Doesn't he just make you smile? I know I was so happy doing this little scene. The background of the card was done with a direct to paper method using stamp pads to swipe on the inks. I did half in blue shades and half in green shades. And, on a white sheet of card stock I stamped Milton and the sentiments with Memento Tuxedo Black ink. That is a great ink to use when one colors with Copics or any type of alcohol markers. It will not smear. I only have a 36 piece of Copics but with blending I can achieve lots of different colors.

The most time consuming thing was all the fussy cutting I did of Milton and the sentiment clouds.  I cut the background out with the largest Memory Box Cross Stitched Frame Borders die and placed this on an A2 size card of white card stock. Lastly with a glue pen I adhered Milton and the clouds onto that background to complete my scene.


I feel so fortunate to have received so many wonderful sets as a gift so my goal is to make at least one card using images from each set.  I still have one last set to work with and I am hoping to do that later this week.

Thanks for coming to visit again and as always I love to see your comments. Take care and may all of you have a wonderful week.

God bless,
Verna

Thursday, January 19, 2017

Edward Elephant Part 2

Today I made another card with the Edward Elephant image but this time it was made from the rubber set which compliments the digital version quite well. I can see especially where the sentiments would be interchangeable between the two sets. Both of these are from the Sparkle N Sprinkle line of stamps. The rubber set is called Edward Elephant St. Patrick's Day 1 #828.


I stamped the image onto white card stock with Mementos black ink and then colored it in with my small set of Copics. Once the scene was completed I die cut it with the Memory Box Cross Stitched Frame Borders die. I also cut a black panel and another light green panel with that same Memory Box die.

All of these layers were assembled and added to a base card of white card stock. The last thing I did was stamp the sentiment on white card stock with the black ink and then again added a spot of color to the shamrock. I fussy cut it out and to my way of thinking it sort of resembles a cloud in the sky. I also stamped a sentiment inside so that it is already for me to mail out.


This is another fun and very uplifting and cheery design and I know anyone who is on the receiving end of this will get a few smiles from it.

Well, another day is almost over and the week is speeding by so very fast. But it has been a good one so I am very thankful and am feeling so blessed. I hope your week is going well too. And thanks for the wonderful comments you always leave me.

God bless,
Verna


Wednesday, January 18, 2017

Friendship Card

I think there is always a time in everyone's life where they feel very down and out and need someone to be there for them. When I saw this wonderful set from Sparkle N Sprinkle I thought it had such awesome sentiments as well as great images to let someone know that you are there for them. And, even if one cannot be there in person for a friend, I know that just keeping in touch can help a great deal to perk them up. For me my greatest friend is my Lord Jesus and He is always with me when I am in a dark moment. I have to remind myself of that quite often too! And I usually feel much better then.


I did a very clean and simple design using the images on the Sparkle N Sprinkle set called Right Beside You #812. This is one of the new release sets they have out. And, I chose to do it only in black and white. I have always found black and white to be a very beautiful combination. I stamped the images and sentiment with Versafine Onyx Black ink on white card stock. Now these are a very wet ink so I let them dry quite awhile while I was fixing lunch this morning. Then this afternoon I die cut the front panel out using the Memory Box Cross Stitched Frame Borders die set.

I then added some ribbon to each corner of the design before I fastened it to the main card base of black card stock. The card was finished by adding a white panel inside.

I will be entering this in the Double D's Blog Challenge which continues their party celebration for their first birthday. This card fit the mood board theme perfectly I thought with the black and white design.


I thank all of you for visiting my blog and I hope your day is going great. We really are having lovely weather with melting snow. And, I had the beegeebies scared out of me when a big chunk of snow slid off the roof of the house. I know it sure startled me and made me pay attention. LOL

Take care and may God bless,
Verna

Tuesday, January 17, 2017

Peep! Peep!

Another Sparkle N Sprinkle stamp has seen use now with the making of this cute card. I just love the little chick on that set and that image reminds me so much of Spring. As a kid growing up on my parent's farm I can always remember the day the little baby chicks arrived in the mail. Hard to believe they could send them that way. I am not sure but I think they were ordered from a catalog. Of course, they had to go to the post office and pick them up. They sure could make a lot of racket too with all of their peeping. I think my Mom usually got around 200 of them and then raised them for laying eggs and also for meat to sell and for our table. Anyway, this set was my inspiration for this card! I also found the use for some Spring Green colored crocheted lace. It fit perfectly with the colors of the pattern paper I used.

The Sparkle N Sprinkle stamp set I used is called Easter Chicky #820.


My design was stamped with Onyx Black ink from Versafine onto kraft card stock and then I colored the design in with colored pencils. I die cut the design with a Cheery Lynn Classic circle die and placed this onto the plaid pattern paper from My Favorite Things which was die cut with the Memory Box Cross Stitched Frame Borders die. I also stamped the flowers onto white card stock with the black ink and colored them with colored pencils too. They were fussy cut and placed  beneath the focal image. After putting all the layers onto the base card of kraft card stock, I then added the green crocheted lace.

I am entering this into Darnell's Blog NBUS Challenge and this time I think I have all the components right. I used kraft, colored pencils and NBUS things....the stamp set and the lace.


Well, that is all I am doing today. I have a few other things that need my attention and not nearly as fun as making cards either. LOL I hope your day is going well and thanks again for stopping by.

God bless,
Verna

Monday, January 16, 2017

Cattelya

One of the sets I got from Sparkle N Sprinkle was this beautiful floral image and the set is called Cattelya Friendship Stamp Set #818. But I had no idea what kind of flower it was or what colors it should be. So I looked it up on Google and found out that it is an orchid and that it comes in almost every color you can think of. I chose these colors for it as I saw one that was similar and thought it to be very beautiful.


I stamped the flowers and sentiment with Memento Tuxedo Black ink onto Gina K. Designs Kraft card stock. I then colored them in with my Copics. After I had the design all colored I die cut the stamped panel with the Memory Box Cross Stitched Frame Borders die set. This panel was then placed onto a base card of Gina K. Designs Tomato Soup card stock. I finished the card by adding the bow and some bling.

Since I did use NBUS (never before used schtuff) on my card which is the stamp set from Sparkle N Sprinkle Darnell has graciously allowed me to still enter this card into her CHALLENGE. Isn't she a sweetie? 


Thanks for stopping by and I love to read all of your comments. They mean so much to me.

God bless,
Verna


Dauber Notecard

I am hoping to get a couple cards done today and so for this design I went with a quick and easy design  using the Hero Arts CL 751 Dauber Bunch stamp set.


I chose this set particularly as I wanted to add it to the A Blog Named Hero Challenge which is ongoing right now.  The challenge is to use something new to me and that would be the Nuvo Jewel Drops I recently purchased. I only got a few colors just to try them and I think I might have to invest in more as they really look nice. But I think I should have had a darker shade either of pink then I did or maybe even gone with a more purple hue.


I stamped the design and sentiment with Versafine Onyx Black ink. Then using small sponge daubers I added colors to the design using Memento inks, namely Lilac Posies, Lulu Lavender, Angel Pink, Grape Jelly and Cantaloupe. The Nuvo Jewel Drops I used were the Rosewater ones and they were added last.

Well, for a one layer card I don't think it turned out too bad. And, it was a quick and easy one to do and reminds me of Spring. I hope you liked it as well.

Well, off to work on another card and hopefully, can get that finished as well. You have a wonderful day.

God bless,
Verna

Saturday, January 14, 2017

Striped Floral Sympathy

Today I had need of a sympathy card for a friend whose husband died recently so I chose to use stamps from Altenew to create this card design.


I used the Altenew Striped Florals set for the focal design and the sentiment is from the Altenew Painted Greetings set. I went with a fairly CAS design which I colored in with Copics.  By adding some bling and a pretty ribbon bow I dressed it up a bit more. In the center of the flower I used a long forgotten product to add a glittery gold look....a pen from a Sakura Stardust Galaxy gelly roll set.

My focal and layering panels were die cut with a set of MFT Die-Namics Stitched Rounded Rectangle Stackers dies. The last step was to add the ribbon and rhinestones.

I think I will leave the inside blank so that I can write a personal message in it. I hope I can find some words of comfort for her.

I am going to enter this in the Mod Squad Blog Challenge in which we are to use bling of some sort on our cards.

Well, here the weekend is whooshing by as well. While my hubby went to a Farm and Home Show event in town this morning I decided to work on this card. It was nice and quiet and a good time to concentrate.

I hope your weekend is going well too. Until next time take care. And, thanks for your sweet words always.

God bless,
Verna

Friday, January 13, 2017

Bejeweled Birthday

I have switched lanes for today's post and am working with some other things I had neglected since I had purchased them. As I stated before, I need lots of birthday cards so I made another one today with stamps from Penny Black.


The first attempt I did was to use watercolors and that was a big failure. There was no way I was going to use that design the way it looked on a card. So my next time I used the small ink cubes from Gina K. Designs and did a direct to stamp inking with the help of my MISTI. I kept adding more colors until I thought I liked the way it looked. I also took the liberty of using a fine detail black pen to add some more of the details of the stamp that got lost in my repeated inking. The floral stamp from Penny Black is called Bejeweled and the sentiment is also from a Penny Black set called Special Wishes,

I used a Die-Namics Wonky Stitched Stackers die set for cutting out the focal image and the layer image. These were all added to a white card base. I finished the card by adding some rhinestones from my stash and a ribbon I just recently purchased from Sparkle N Sprinkle. It was supposed to be a type where you pull the string and it makes a cluster type decoration, but I removed the string and instead used it to make a ribbon bow. The string is a pretty color too, so I will save that for another project.

I am entering this in the Mod Squad Blog Challenge in which the requirement is to use bling.

Well, another week has sped by like crazy. I spent a good portion of the day getting a different TV lineup with my DISH set up so I was limited on crafting time. I also had laundry to catch up on as well.

I wish to thank all who come by and comment. I just love to see what you have to say. Everyone have a great evening and weekend too!

God bless,
Verna

Thursday, January 12, 2017

Edward Elephant Part 1

One of the stamp sets I won at Sparkle N Sprinkle is a digital one. It is called Edward Elephant St. Patty's Day #2-Digital Stamp 3129.  Now I seldom use a digital stamp period not to mention a whole stamp set so a good portion of my time was spent on learning how to make use of this set. I hope I achieved that goal with this card design.


First of all using my computer and printer I did a copy and paste to a Word doc. and created a background sheet using the single clover. I then printed that out, sponged on some light blue color with a Tim Holtz tool and colored it in with Copics. I also did a copy and paste of the circle elephant image and repeated it several times so that I have more of the image printed out for future use. This was also colored with my Copics.

For the focal design I used a couple Cheery Lynn Designs circle dies to cut out the image and also a frame to layer it on. I also die cut the pattern paper and another outer layer using a die set from Die-Namics.

Once I had all the layers assembled and added to the base card of white card stock I added a ribbon bow and some light green rhinestone jewels in each corner.


There was a sufficient amount of the pattern paper left that I had created so I added it to a strip of darker green card stock and placed it inside the card. The last step was to add the sentiment.


Supplies Used:
Sparkle N Sprinkle Edward Elephant St. Patty's Day #2-Digital Stamp 3129.
Cheery Lynn Designs Dies: XMS XM Scalloped Circle; XL-4 Circle-Classic
Die-Namics Die MFT-567 Stitched Rounded Rectangle STA
Copic Markers
Crafter's Companion Glue Pen
Tim Holtz Sponging Tool
Rhinestones-Unknown
Ribbon-Unknown
Scor Pal

One can also print out a pre-colored Edward Elephant image but I chose to color my own version of him. It feels more like regular stamping and I do love to color anyway!

I am entering this card into the Mod Squad Blog Challenge in which we are to add some bling.

I thank you for stopping in and your comments always make me feel so good.

God bless,
Verna

Wednesday, January 11, 2017

Retirement Congrats!

Two of the sets I won from Sparkle N Sprinkle go together for a party theme. With these sets I made a card of congratulations for a special gal who will be retiring soon. This is a set of stamps that can work for many celebratory occasions.


Since the one stamp is quite large I pulled out my MISTI so that if needed I could stamp it several times to get a good impression. Good thing I did as that was exactly what I had to do. Once I had my big square stamp design done using Memento black ink I then colored it in with Copic markers. After all the coloring was done I added a little sponging with Memento dark blue around the outer portion of the design to create more shadow and dimension.

Using two of the sentiments from the second set of stamps I placed them onto the main design. I also added three stars and colored them in with yellow. To add a bit of shimmer I added some Wink of Stella to all the stars. Now I was ready to place this onto a Cheery Lynn Designs square die and used this as a frame. By putting this onto a square base card of white card stock my card was complete.


Supplies used:
Sparkle N Sprinkle Party 1-Balloons #821 and Party 2-Sentiments #822
Cheery Lynn Designs DL315 Deutschland Square Doily
Scor Pal
Crafters Companion Glue Pen
Memento Tuxedo Black and Paris Dusk dye inks

I ended up with a card 4 1/4 x 4 1/4. I might have to make a special envelope for it or more than likely I will put it in a larger envelope and mail it that way as it would be a cheaper rate.

I hope you have enjoyed seeing this card I made. I know I really had fun creating it as well. Have a great evening now and thanks for visiting.

God bless,
Verna


Tuesday, January 10, 2017

Sparkle N Sprinkle

Yesterday I got the stamp sets I was so lucky to win from the new release that Sparkle N Sprinkle has out and so today I made a card using one of the sets. Most of you who follow my blog know I am pretty much a CAS card maker and this is pretty much the case with this one but I did bling it up some with some glitter all over the surface of the card.


I stamped the design with Memento Tuxedo Black ink and then colored the image with Copic Markers. Once I had it all colored I die cut it out with a Die-Namics Blueprints set. I stamped the Thanks separately on white card stock and cut it out with one of the dies in that blueprint set. I cut another one out as a layer for the one with the sentiment on it and used some of the Copics to match the card stock. Normally I would have used card stock that matched the card base but I did not have a little snippet to work with so I instead tried to match the Copic ink.

Using a Versamark ink pad I swiped ink all over the front panel and those layers for the Thanks sentiment and added some Sparkle N Sprinkle embossing powder to give a glittery look. Once this was heat set I then assembled the card together. I finished it off then by adding a pearl heart to the sentiment and a pink and white polka dot bow.


Supplies used:
Sparkle N Sprinkle Emily Showers of Love #831 stamp set
Sparkle N Sprinkle Sparkle EP107
Versamark Ink Pad
Scor Tape
Memento Tuxedo Black ink
Ribbon from my stash
Pearl Heart-Hero Arts
Die-Namics MFT-914 Blueprints 29

I am so thrilled to get the newest sets from the release and I hope to make a card from each of them and post them on my blog.

Over the weekend I did not do any card making but instead got my Christmas tree down and some of the other decorations put away. That always takes some doing and alas, no grandsons to help with the project like when we put the tree up. But Grandpa and I managed to do the job!

Well, I hope your week is off to a great start. Thanks for stopping in and as always I love to see your comments. I read all of them too!

God bless,
Verna

Friday, January 6, 2017

Using the Foiled Negative

As I stated earlier I am in need of lots of birthday cards in the next three or four months so I thought it best to get started on a few of them ahead of time. This one I made using the foiled negative from the card design I did yesterday. I wanted this to be a more masculine theme and I chose the gold foiled sentiment to go with some Gina K. Designs Eggplant card stock.


For my background on the front panel I used a Cuttlebug folder from the Winter Collection which is a plaid design  After I had embossed the design I went with a Encore gold pigment ink pad and lightly tapped on some ink. Then I took some Gina K. Designs detail gold embossing powder and sprinkled that on. After heat setting this background I then added it to a Gina K. Designs Ivory card stock base.


All that remained to do then was to add the foiled negative piece which I had adhered to a sticky paper and then die cut around it with a Cheery Lynn Designs scalloped die. This negative piece was left after I used a Gina K. Foiling Sheet sentiment previously and covered it with iCraft Deco Foil.  I just could not stand to toss this away as it looks so gorgeous now on this card.

Supplies:
Cheery Lynn Designs Die: XM-5 Scalloped Circle
Gina K. Designs-card stock and foiling sheet
iCraft Deco Foil
Sticky Paper-Sparkle N Sprinkle
Encore Gold Pigment Ink
Scor Pal
Crafters Companion Glue Pen
Cuttlebug Embossing Folder-Winter Collection


You can check the post previous to this one to see the way I originally used the sentiment design. I like the way it looks both ways.

I am entering this in the Mod Squad Blog Challenge in which the theme is Anything But Christmas, Crop Stop Blog Linky Party #23 Anything Goes, and also in the Scrapy Land Blog Challenge #57 which is Anything Goes.

Thanks for stopping in and for all the awesome comments you leave me. I hope you have a wonderful weekend.

God bless,
Verna

Thursday, January 5, 2017

Another Birthday Card

Today after I got some of my housework done I played again with foiling and once again used the card stock and supplies I already had on my work area to create a more clean and simple card design. But with a white embossed panel and with some gold foiling it turned out have a elegant look to it regardless.


For inspiration I once again took my design from elements listed in the Double D's Inspirational mood board photo. They are celebrating their one year birthday or anniversary. And the sentiment I chose for the card had only one candle on it so I thought it was a perfect choice.


I used some of the pre-printed toner sheets with sentiments on them that Gina K. Designs sells. The sentiment was die cut with a scalloped die and I also used a Deco Foil Toner sheet on which I die cut the outer circle. Before I added the foil to my sentiment piece though I colored in a portion of it with a peachy colored Copic marker. I wanted some color added to match the main card of Gina K. Designs Peach Bellini card stock.

My white embossed panel was done using a Cuttlebug embossing folder called Floral Fantasy. I thought it matched the design on the One image in the inspirational photo. After I had layered this to the main card I then proceeded to add the foiled sentiment design.


The final addition to the card was to add a double bow ribbon which had threads of gold running through it.

Dies used:
Cheery Lynn Designs XM-5 Scalloped Circle and XL-4 Circle-Classic
Other Supplies;
Gina K. Designs-Card stock and pre-printed toner sentiment sheet
i-Craft Deco Foil Toner Sheets and i-Craft Deco Foil Sheets
Crafter's Companion Glue Pen
Cuttlebug Embossing Folder-Floral Fantasy
Ribbon-Unknown
Copic Marker-YR00 Powder Pink

This will be entered into the following challenges:
Double D's Blog Challenge-Birthday/Anniversary
Scrapy Land Blog Challenge #57-Anything Goes
Mod Squad Blog Challenge-Anything But  Christmas

Well, we are in a cold, cold spell. This morning it was 18 degrees below zero. And below zero highs too! Good time to stay inside where it is warm and I am so grateful that the power is back on. That would have been even more rough with temps like this. As it was, during that time we had fairly mild temperatures so that was a plus. You have a great evening now. And thanks for the visits and all the great comments.

God bless,
Verna

Wednesday, January 4, 2017

Peach Rose Birthday


Today I started supplementing my birthday card supply. Lots of birthdays will be coming up in March as well as an anniversary.


For inspiration I used the photo shown at the Double D's Challenge Blog as they are celebrating their first year anniversary during the month of January and are offering prizes too. I chose to use the colors of peach, green and white and did a rose flower design.


The stamps I used for the flowers and leaves is from the Gina K. Designs set called Better With You and the sentiment is from Gina K. Designs set called Made With Love. Gina K. Designs inks used were Peach Bellini and Fresh Asparagus. I also used Versafine Onyx Black ink for the sentiment.


The flowers and leaves were done with a masking method. But as I wanted a more subtle color I took and swiped some of the ink of each color in the lid and with a blender pen picked up the color and got more of a water color look. I then fussy cut this design. And, in the center of the blooms I did one rose blossom separately and popped it up over the others. 

I used Gina K. Designs Peach Bellini and Jelly Bean Green card stock for my card and die cut the peach panel for the bottom layer and then after the top layer of the same size was die cut I proceeded to take another die and cut a scalloped stitch edge. These were layered together and placed on the white card stock base. The roses were placed on this panel. After adding the sentiment I then finished the card with some white pearls and a double loop white organza polka dot ribbon bow which was made with my Craft-Dee BowZ bow maker..

Dies used are:
Die-namics MFT-839 Wonky Stitched Rectangles and Die-Namics MFT-986 Stitched Scalloped Basic Edges.

Other Supplies:
Crafters Companion Glue Pen
2-Way Glue Pen
Pearls-Eyelet Outlet
All Night Media Mini Pop Dots
Scor Pal

This will be entered in the following challenges:

Well, I had planned so much that I was going to accomplish today but alas, this is the only card I completed today. But it was fun. Yesterday I had to bake and do laundry so that was as creative as I got. 

I hope your new year is off to a great start. I know mine is. I just found out that I won the entire release from Sparkle N Sprinkle for just leaving a comment. I am thrilled! I think I have lots to keep me busy for a long time to come now. And, the new release has so many wonderful stamp sets too. I know I am a happy camper at least.

Well, time to work on the evening meal. Thanks for dropping in and for all the wonderful comments. I read them all and love to hear from you.

God bless,
Verna


Monday, January 2, 2017

Foiled Cards

For Christmas I got a laminator as I had told hubby that was what I wanted. So when Gina K. Designs had a sale awhile back I took advantage and bought a lot of her foiling sheets she has printed already for making foiled backgrounds and sentiments. So today I tested my laminator and used one of her sheets to make a couple of cards. I don't know it this has been done before but after I had foiled the design onto the first card, I looked at the leftovers and decided there must be a way to use that as well on a card so that is what I did.


The card on the right was done the normal way by inserting the foiling sheets and the foil between a sheet of thin printer paper and running it through the laminator. Then I used a die to cut out a purple layer of card stock to add to the front panel of a white card base. I also used a die to cut the foiled design panel too. These were layered onto the card base and then I added the sentiment which was die cut from the same purple card stock. Since there was a thin strip of the foiled paper left I added a little inside the card.


The card on the left was made with the leftovers. I hope you can see that the pretty pattern that was left created a neat look too. So I took some sticky paper and added that layer to it. It seemed that it was sort of sticky where the design had been pulled off  so I added some clear embossing powder and heat set it. I then placed that onto a white card base too. I don't know if that was necessary but I did it as a precautionary measure. I also added a die cut sentiment on the front of that card too. It got a little crinkled when I added it to the sticky paper but I think I like that textured look.


The dies I used are:
CARA-26 God Bless-Cheery Lynn Designs
Cross Stitched Frame Borders-Memory Box

Other Supplies:
Foiling Sheets-Gina K. Designs
iCraft Deco Foil
Bonsaii Laminator
Glue Pen-Crafter's Companion
Sticky Paper-Sparkle N Sprinkle
2-Way Glue Pen
White and Purple Card Stock

I only did the one experimental sheet and I ran it through about four times and each time I turned the folded copy paper with the foiling sheet inside it a different direction and even upside down in hopes it would completely take to the design and it did. I am very pleased with the end results.

I am entering this in the Dies R Us Challenge-Anything Goes.

Well, another adventure in card making using foil. I thank you for stopping in and looking at what I did. Thanks for the lovely comments too!

God bless,
Verna

Sunday, January 1, 2017

Toasty Warm

Happy first day of 2017! Now I will  have to adjust my mind to remembering the new year when I write out checks and need the date for other documents. I always struggle the first three months at least. LOL

For my card design I went with a toasty warm theme as our first week of January is to be more on the frigid side. In fact, we may only see below zero highs for a few days. I think we had our January thaw in December when we got all the freezing rain and thus lost electric power. So I hope that is the last episode of that, It was an adventure but it was sorely missed at times. We were so lucky we had a generator that held up and worked well.


The background of my card is a pattern paper in a sweater design from Gina K. Designs which was part of a freebie incentive at one time and I thought that represented a great way to get warm and cozy. I also chose a die set of the cocoa cup with the deer on it which I recently won in the coffee hop I participated in and that is from Gina Marie Designs. The sentiment I used is from a Gina K. Designs stamp set called Coffee which is illustrated by Claire Brennan. It expressed my thoughts perfectly and that was stamped with black Versafine ink onto white card stock and cut out using a Cheery Lynn Designs die set before layering it onto red and white layers too.

I think this card could be used for a winter greeting or also for a Valentine with all those pretty hearts on that background paper. That will be the next holiday to make cards for so I might have a head start on it with this card.

I took a white Galaxy Marker to add some froth from stirring the cocoa in the cup and also used some brown dye ink and sponged more on the deer's antlers. I am so pleased with the way this looks and just love the dies used on it.

Supplies:
Coffee Stamp Set (sentiment) and Sweater Pattern Paper-Gina K. Designs

Dies used:
Cocoa Cup Set-Gina Marie Designs
Scalloped Circle-XM-5-Cheery Lynn Designs

Other Supplies:
White Galaxy Pen
Score Pal
Mementos Brown Dye Ink
Black Versafine Dye Ink
2-Way Glue Pen
Glue Pen-Crafters Companion
Crossover Die Cutting Machine

This will be entered into the following challenges:
Mod Squad Blog Challenge-Warm and Toasty
Dies R Us Challenge-Anything Goes

Well, another year and I hope it is a great one for all of you. Thanks for visiting and as always I love all the comments you leave too!

God bless,
Verna

Fluttering By

 First of all I want to wish all my Canadian friends a Happy Canada Day! I hope your day is extra special. This card I am showing uses an Al...