Wednesday, February 25, 2015

Mini Bokeh Effect

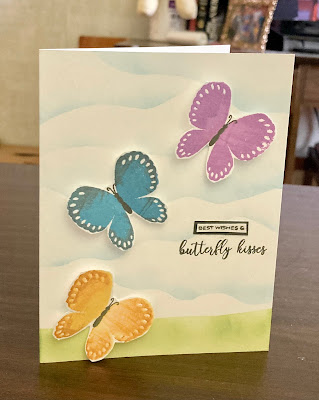
Sorry I have not done much this week but health issues are bothering me these days and so I am not very energetic right now. But over the week I did manage to do a bit each day on this simple card and create a little note card.


I thought it would be cool to try and created a mini Bokeh Effect background with a stencil I purchased last week from the Stampinback line from I Brake for Stamps called Dots. I used various colors of ink and did a layer of one color at a time.  After I cleaned the stencil off and dried it, I proceeded to add another layer of a different color by moving the stencil slightly. I kept repeating this and each time using a different color. My last little white dots were added with a Q-Tip.

My bold flowers and sentiment which are also from Stampinback and available at I Brake for Stamps were inked in black ink and added to the front panel of the card. My sentiment was stamped on white card stock and then layered onto a black piece of card stock.

Well, just a little bit of creativity each day helps to make me feel better. Well, guess it is back to the recliner now. Don't worry about me. I am going to be fine but some antibiotics affect me in a negative way sometimes. LOL

I hope all of you are having a great week. And thanks for stopping by to see my blog.

God bless,
Verna


Sunday, February 22, 2015

Embossing Folder Background

Some time ago I saw a technique video on how to make a background using inks and your embossing folders at Splitcoast Stampers.  I admired the look achieved with that technique and also liked the fact that I could use my embossing folders for more than just regular embossing.

This is my first attempt with the technique and I used a Cuttlebug embossing folder called Celtic Knot. It involved using Distress Inks in the colors of Peacock Feathers and Mowed Lawn. I simply directly added the colors by swiping the ink pads across the folder and then spritzing with water before I placed my white card stock on top.


Once the background was dry enough I stamped the sentiment from Embossing Arts called Favorite Lucky Charm. It is available at I Brake for Stamps. The card was completed by adding the panel to layers of complimentary card stock and adding a few dark green pearls for embellishment.

Well, I made several of these and will be using them for my shut-in friends for St. Patrick's Day.

Have a great week and thanks so much for visiting my blog.

God bless,
Verna

Wednesday, February 18, 2015

Splat! I Have a Background!

I just had to join in the  Scrapy Land Challenge which advocates making your version of Splats! on a background or card design. And there is nothing more fun to me then getting out any inks, paints or other mediums to make a background. For this card I chose to use alcohol inks.


I chose to use dies from Cheery Lynn Designs for my card. And, I cut them all out in black card stock except for the angel wing die that goes under the butterfly and the center panel for the sentiment. The angel wing was cut from my Splats! background and then glued to the black overlay butterfly die. I popped the butterfly up to give the card more dimension.

Below I will show you my backgrounds I made before I finished them into a card design.


First of all I used white glossy card stock. The colors of alcohol inks I used to drop some splats were Andirondak Willow, Shell Pink and Cloudy Blue. I just dropped the inks randomly and watched the magic begin.

The dies from Cheery Lynn Designs I used were FRM132 French Lattice Small FrameDL 156 Small Lace Butterfly with Angel Wing, and an older die of Cheery Lynn Designs which I have used over and over to get perfect layers called ST 014 Card Maker's Stacker's Nesting Dies. That was how I die cut the rectangles for the sentiment and the black layer.

I chose to use a complimentary light blue card stock for the base card and also for the rectangle where the sentiment from I Brake For Stamps was stamped in Gina K. Designs Black dye ink.

And, of course, this is my usual style of a more clean and simple look for a card. Good thing I restricted my die cutting to a few only a day as my arm and shoulder still bother me some. But I find it so fun and love to see how the dies one uses really make a beautiful addition to a card.

I am also entering this in the Cheery Lynn Blog Challenge to make a card that is not square. I think this qualifies since it is rectangle.

Thanks for looking and I hope your week has been going fantastically!

God bless,
Verna

Tuesday, February 17, 2015

More Bokeh Effect!

This morning I worked with some glossy white card stock, the Andirondak alcohol ink colors of bottle, stream, lettuce and butterscotch along with the blending solution to make a background. I used a round sponge applicator to apply the inks. That looked great in itself but I carried it a bit further and made it look like the Bokeh Effect by taking a sponge dauber, a finger dauber and a pencil eraser tip to create the look by stamping them onto the background randomly with Gina K. Designs White pigment ink.


I layered this bokeh panel onto Gina K. Designs Honey Mustard card stock before adding it to the white base card. My center panel was stamped with images using Gina K. Designs Black dye ink from the Gina K. Designs Birthday Blessings set. I then used Copics to color in my image. Lastly I stamped the sentiment onto the center panel before I layered it onto the Honey Mustard card stock.

After all layers were assembled I added a Honey Mustard color ribbon to the front and also added a strip of some of the background paper and Honey Mustard card stock inside to tie the front panel to the inside.

One can never have too many birthday cards on hand and it seems since the family keeps growing I will certainly find a use for them. And, the last TV kit from Stamp TV is all about birthdays. I really love that kit.

Thanks for looking and I really appreciate your comments too.

God bless,
Verna

Monday, February 16, 2015

By The Sea

Sometime ago I did a background using the Bisters and since that time was wondering how to use it. It sort of looked like a sea scene background so that is what I did with it. Colors used were Mahogany, Brown and Blue.


The sea bird and the sentiment are both from the Gina K. Designs By the Sea set illustrated by Theresa Momber. I also used layers of Chocolate Brown and Faded  Brick Gina K. Designs card stock. My scene was stamped with Versamark first and then inked again over the top with Gina K. Designs Black ink so that I could emboss it. My embossing powder I accidentally grabbed was Gina K. Designs Chocolate Brown instead of the Black but I still thought it worked well. I stamped the sentiment also in Versamark and then in the Black as well and embossed it.

Once I had the stamped bird and sentiment embossed, I then took an old blender pen and dipped it in bleach to lighten up the bird image. I still did not think it white enough so I used a white paint pen to color over that to make it look more realistic in color. Also with the white pen I added some more movement in the water by the post trying to get a crashing wave effect. I then colored over it with my Copic markers to blend it in more.

Making the background with Bisters is so easy. You just tap some of the granules on your paper and then spritz with water. And, once the background is dry you decide how you want to use it. It is always a fun surprise to see the end results.

Thanks for looking and I hope your week is off to a great start.

God bless,
Verna

Sunday, February 15, 2015

Love Arrangement Wedding

Saturday I got a new die in the mail and so I decided today I would work up a card for a wedding using that die cut. I went with the colors of Gina K. Designs Edible Eggplant and Lovely Lavender card stocks along with white for this card. I also used Edible Eggplant dye ink to stamp the sentiment which is an old one I purchased years ago and is designed by Annette Allen Watkins and put out by Stampworks.


The die is called "Love Arrangement" DN-1136 and is from Die-Namites. I had ordered this in January and it arrived on Valentine's Day so I decided it would not work this year for a valentine so I went with a wedding theme. Oh, and the extra hearts along the edges are the ones that fell out of the die cut. I figured I might as well use them too!

I punched out a heart shape with a Marvy Uchida Punch from the Lovely Lavender card stock and placed it behind the die design. Over this I added my ribbon. In order to get the ribbon to match I took Copic Marker BV08 Blue Violet which matched the Edible Eggplant fairly well and colored along the edges of it. I also used the marker to color the little gem hearts and the gem in the center of the flower.

Below is the photo of the die I used on this card.


And here is the sketch which I loosely interpreted for my card design. My card is more of a flip of the sketch below. Hopefully, this will still be acceptable.


I am entering this into the challenge at the Die-Namites blog for February which requires one to use hearts on their entry and the sketch design.

Thanks again for checking out my blog post and I hope your week will be a wonderful one.

God bless,
Verna


Friday, February 13, 2015

Another Acrylic Block Watercolor Background

One of my favorite things you all know by now is to do CAS cards. Well, believe me nothing is so clean and simple as using an acrylic block to capture a colorful background for a silhouette stamp. By swiping colors onto a block and spritzing with water you can make beautiful backgrounds.  Here is one I did this week.


The silhouette family image and sentiment are both from I Brake For Stamps. I layered the white, black and blue card stocks to showcase the focal image. I also carried the card stock layers over to the left bottom inside panel to tie the colors together. I used ink pad colors which I thought might look like a sky at dawn. I suppose it could also work for a sunset as well.

My arm is still bothering me somewhat but I am able to do layering much easier than using my Big Kick to crank out die cuts. And stamping does not seem to bother me either. I think in the last few weeks I overdid it with cranking out dies  and so therefore I injured it. But it is slowly getting better so I am hoping by another week I can be back to normal.

Well, here it is the weekend again. It seems time flies by with so much speed these days. Guess I am having too much fun! LOL I hope you have a great one,

God bless,
Verna

Fluttering By

 First of all I want to wish all my Canadian friends a Happy Canada Day! I hope your day is extra special. This card I am showing uses an Al...