Friday, June 28, 2019

Red! You Bet!

A retired farmer friend of ours is celebrating his 85th birthday and since he collects and restores the red International/Farmall type tractors I decided to make his birthday card showing a farmer on a red tractor. I hope he likes it. I had a fun time making it.


I used the Penny Black Life is Simpler stamp set on the card and colored the image in with Prismacolor and Gamsol. I also took a Stampenback stencil and added some clouds to the design. It is a no layer card but I had debated whether or not to frame it but in the end decided to just leave it this way. 

Thanks for the visit. And come back soon. I love to see your comments too.

God bless,
Verna

Thursday, June 27, 2019

Fourth of July Shirt Card

Yesterday I recalled that the Fourth of July is coming up really soon and I had no cards made for the shut-ins. And since all the shut-ins are guys I made up cards that sort of resemble a shirt and tie ensemble. I hope it will pass off as such at any rate. LOL

Oh, and I found the dies that were lost which is a good thing. I stuck them in a small pizza box and inside a drawer. All of a sudden I recalled where I had put them. So miracles do happen.


Some of the shirt was done with dies and some with hand cutting. And, I used the brushes to blend on some color so that the elements resembled a shirt somewhat. Oh, and I used the Plaid Maker stencil to do a red, white and blue plaid which I decided would work for a handkerchief in the pocket. I know the neck of the shirt is not right but I had no idea how to make it look any better so I just left it alone. Anyway. I made several with this same design. So now I can send them out tomorrow.

Supplies used:
Cheapo Dies Patriotic Bow
Cherry Lynn Designs-Buttons
Pocket-Quick Cutz Nesting Tag
Artplortions Plaid Maker Stencil
Gingerbread of Arlington, SD-Sentiment (no longer in business)
Crafter's Companion Glue Pen
Gina K. Designs Connect Glue
Inks-Gina K. Designs
Life Changing Blending Brushes from Picket Fence Studios
Card Stock from my stash from years ago.

I am entering this in the following challenges:
Dies R Us Challenge-Summer
Scrapy Land Challenge #116

Well that does it for me this week. I wish you all a wonderful weekend. Until next time take care.

God bless,
Verna

Wednesday, June 26, 2019

Mixed Media Tag

I had made a tag to put in another challenge but I missed the deadline by a few minutes. But I decided to share it with you anyway and enter it in the June Stamplorations Artplorations Mixed Media Challenge. 


The first thing I did was to take a stencil and using lime colored card stock made the plaid pattern by adding red and darker green inks from Gina K. Designs. I then die cut the tag base from red card stock using a die from a Quick Cutz Nesting Tag set. I also took a die from the same set and cut out the plaid layer so that it would fit inside the red tag. The next step was to stamp the reindeer and the sentiment with Gina K. Designs black ink. I colored the reindeer with Prismacolor pencils and Gamsol and then die cut the deer out with the dies that matched it. These were placed onto the plaid design and the tag was finished by adding some sequin snowflakes.

Supplies used:
Artplorations Plaid Maker Stencil
Stamplorations Christmas Reindeer and Cutplorations Matching Die
Quick Cutz Nesting Tag
Gina K. Designs Connect Glue
Crafters Companion Glue Pen
Kat Scrappiness-Snowflake Sequins
Ribbon-Generic
Inks-Gina K. Designs
Card Stock-Gina K. Designs

I had just recently acquired the Plaid Maker stencil and I just had to play with that as well as the new stamp set I purchased. I love this tag and really love the plaid.

Well, thanks for the visit and I appreciate all the wonderful comments too.

God bless,
Verna

Tuesday, June 25, 2019

June Rudolph Days

Once again it is time for Scrappymo's Rudolph Days Challenge and this is the card I made for it. I hope you like it.


The first thing I did was lay the large circle stencil from Picket Fence Studios onto Ivory card stock and then with the Life Changing Blending Brushes I added red and green colors using a light touch so as to not get it too dark. Once that was done I then stamped the images twice from the Picket Fence Studios String of Lights set with black ink using my Misti so that I could do repeated inkings. I wanted a good dark printing and that was a way to make sure that happened. I then cut that rectangle down to approximately 5 inches by 3 3/4 inches and then placed it onto a red card base. The sentiment is also from the same stamp set so I did that with black ink and then cut it out by hand and added it over the top of the design. Inside I also added another sheet of Ivory card stock for the sentiment or hand written message

I hope everyone had a great weekend. I was busy all day yesterday as we got a new refrigerator. The old one still worked but I got a new one for my kitchen and the old one will go out to my hubby's mancave (shed). And it is shocking how much things one puts in a refrigerator/freezer. I also washed out the old one really good too so that it looks like new as well. We got some help moving the refrigerators into the house and shed so that was nice.

Well, I wish you all a great week. Thanks for stopping in.

God bless,
Verna

Friday, June 21, 2019

Let the Sun Shine!

I had to make a card to fit the Impression Obsession Challenge-Sending Sunshine and the only way I could think of doing so was to take a scene die and add my own sunshine. So that is what I did with this wonderful lighthouse die cut.


On white card stock I die cut the lighthouse scene and then proceeded to blend inks with my brushes to make the colorful background on another sheet of white card stock. I sort of guesstimated where the colors would be needed for the sun, the rocks, sun on the water and the roof of the lighthouse. It worked out pretty good I think too. Next I glued the die cut panel onto the colored card stock and then with my trimmer cut the panel down about a quarter inch on each side and then added it to the orange card base. The last thing I did was to add the sentiment.

Impression Obsession Supplies Used:
Lighthouse Circle DIE548-Z
Life Stuff Sentiments CL491

Other Supplies Used:
Gina K. Designs Inks
Crafters Companion Dotted Tape Pen
Life Changing Blending Brushes-Picket Fence
Die Cutting Machine

I must say I always enjoy all the wonderful comments you leave me. I hope all will enjoy your weekend.

God bless,
Verna

Thursday, June 20, 2019

Patterns

I am really into using stencils and I have been fortunate enough to be able to acquire several stencils lately so with one of those I used it to make a pattern on this tag. I also chose a ribbon for the tag that had a pattern on it and a stamp that was also filled with a pattern design.


I chose to use  Stamplorations products for the design of the tag and other products like ink, card stock, glue and ribbon from other sources.


Here is a list of all the Stamploration products I used for it:
Cutplorations Luggage Tag Die
Artplorations Helen G. Make Marks1
Stamplorations Shery Russ Trendy Spring Blooms (flowers)
Cutplorations Trendy Spring Blooms Dies
Stamplorations Shery Russ Bloom Happy Stamp Set (sentiment)

Other Supplies:
Gina K. Designs Red Velvet Ink and Amalgam Black Ink
Memento London Fog Ink
Gina K. Designs Red Velvet Card Stock
Gray Card Stock Unknown from my stash
Gina K. Designs Connect Glue
Crafter's Companion Glue Pen
Ribbon-American Crafts
Die Cutting Machine

I am entering this in the following:
Stamplorations Artplorations Mixed Media Challenge
Mod Squad Challenge-Mixed Media Tag
Double D's Challenge-Pick a Pattern

Well, I wish all of you a wonderful weekend as tomorrow is Friday already. My week flies by it seems. I guess that is because I keep myself busy. Until next time take care.

God bless,
Verna

Tuesday, June 18, 2019

A Summer Scene

Or at least this is a scene we see a lot by our farm. The deer are quite abundant and many times we see a deer on the bridge that goes across the river by our farm. The die used on this scene had no leaves so I took the liberty of adding some with a Bic Ultra Fine Line Marker. I really like this and it will be a birthday card for a guy too!


The die used for this card is from Memory Box and is called Woodland  Bridge Frame. The tree frame and the bridge and deer as well as the outer frame are all part of the die set. You can use them together or separately. I chose to use them in a similar fashion as was pictured on the Memory Box envelope.

This scene was added over the top of a blended background that I did with Gina K. Designs inks and the Life Changing  Blending Brushes. And I chose to use a sentiment from my Impression Obsession Life Stuff Sentiments stamp set. I stamped it with Gina K. Designs Amalgam black ink onto Ivory card stock. I then cut out the sentiment by hand, All of this was then added to an Ivory card stock base with Gina K. Designs Connect Glue to complete the design.

Below is a close up to show off the pretty design along the frame of this die. I really like that.


I am entering this in the Dies R Us Challenge #123-Summertime.

And when I was cleaning awhile back I put some of my dies into a safe place and for the life of me I cannot find that safe place. I searched for over an hour and finally decided to just go with this scene. I do like this scene but it puzzles me as to where I put that box of dies. They were all from one company and so I kept them separate from the rest. Hopefully, I will run across them one of these days. LOL Just goes to show I might have too many things.

Thanks for visiting and I wish all of you a great evening.

God bless,
Verna

Trying for Vintage!

I was trying to make a vintage looking card and I think I did that with this design using Gina K. Designs stamps.


My first step was to make a background using Ivory card stock and some Tim Holtz Distressed Ink Peeled Paint and Mowed Lawn and the Gina K. Designs Petite Flourish background stamp. I added the ink to the big stamp by applying patches of both colors. Once I had that stamped I cut it by hand using a Deckle Edged scissors and then I took the Life Changing Blending Brush and added some Tim Holtz Distressed Ink Old Paper ink along the edges. That was the background. Over that I added a strip of light green lace to which I also added some Old Paper ink and hoping to give it an aged look.

The flowers from the Gina K. Designs Stippled Flowers set were stamped with Gina K. Designs Amalgam black ink and then colored in with Prismacolor pencils and Gamsol. These were fussy cut and then added over the lace in the lower right corner. This panel was then placed onto some Gina K. Designs Dusty Rose card stock to which I also used the Deckle scissors and did some distressing with the Old Paper ink. These layers were then placed onto a Gina K. Designs Prickly Pear card stock base. The sentiment from the same stamp set was stamped onto Ivory card stock with the Amalgam black ink and then was hand cut and placed onto the front panel.  The card was finished by adding a an Ivory panel inside as well.

Later in Summer I have some anniversaries coming up so I thought I would get a head start on making some of those. I really love how this turned out and I hope I achieved the vintage style.

Take care everyone and thanks for the visit.

God bless,
Verna

Monday, June 17, 2019

Thy Word Is A Lamp

I brought out an older wood mounted stamp that I received from my time I spent making cards for Rubber Stampede. Their in house artists were so busy at that time that I was asked to make cards with some of their stamps so that they could be displayed at their shows. And in return I was given some product. And, I just love this lighthouse image and the wonderful verse that came with the stamp. I hope you like the way I used it as well.


The stamp is named Thy Word Is A Lamp. I stamped the image with Versafine Onyx Black ink and the used Prismacolor pencils to color it in. The one exception is that for the sky part I took a Life Changing Blending Brush and added some Memento London Fog ink. The last thing I did after cutting out the design with my paper cutter was to add two additional layers of black and light turquoise before adding it to the white card base.

I am entering this in the following challenges:
Mod Squad Challenge-Light Your Way
Word Art Wednesday

I hope all the Dads had a great Sunday. Hard to believe we have gone through nearly half of a year already. Time sure flies. Thanks so much for visiting and I wish all of you a great week.

God bless,
Verna

Friday, June 14, 2019

Lemonade Thank You

I made a card to enter into the Impression Obsession Challenge-I'll Drink To That! I confess I had no stamp or die by IO that would fit so I ordered one in hopes it would come in time. It came in today's mail so I decided to make up a quick card with it.This is the card I made using a few of the elements from the new die set along with another die set.


I die cut the lemonade glass and elements from white vellum paper. I then colored them with markers. I had already in my stash a lime green card base so I took another scrap of pattern paper with a circle cut out of it and that made the base of my card. I then added the lemonade and lemon slice to the circle area and stamped the sentiment with black ink. The last thing I did was add the frame around the card.

Dies used:
Impression Obsession DIE185H-Mixed Drinks Set
Impression Obsession DIE805-YY Checkered Frames

Stamp Set Used:
Impression Obsession CL653 Mini Messages3

Other Supplies:
Gina K. Designs Connect Glue
Gina K. Designs Pattern Paper
Tombo Markers
Versafine Black Onyx ink

Well, the weekend is upon us and if you are like me no doubt some of your kids will be joining you for the weekend to help Dad celebrate his day. And if not I still hope the weekend is a great one for you. And, to all the dads out there! Happy Father's Day! Thanks for stopping by.

God bless,
Verna

Tuesday, June 11, 2019

June Twofer Card Challenge #17

Well, when I saw that Darnell's Twofer Card Challenge #17 called for us to use BEES I said "What??" I could not recall any bee images in my stamps or in my dies but yesterday I went through my stamp sets and finally found a bee. I had an abundance of dragonflies, butterflies and even an old regular housefly but I was almost ready to give up when I finally found one. And that was no easy task as I am like most stampers and have a lot of things to search through. So finally I had a basis on which to construct two different cards. I hope I was successful as this was a most challenging thing for me with only one choice of a bee to work with.


The stamp set I found with a bee on it is A Jillian Vance Designs Simply Said: Happy Daisy. It worked out well for me to create two different cards. I hope you like what I did as well.


For this first card I used some Gina Marie Designs Circle Stitched dies. For the first die cut around the bee and sentiment I kept it in the die and then gently took my brushes and added some light blue color. Then I popped it out of the die and added it to another stitched circle. I laid them aside and then took a Lawn Fawn Stripey Backdrop die and cut a black panel which I placed over a lighter yellow card base. Then I was ready to pop the sentiment panel on top and complete the card.


This second card went together quite fast too once I figured out a design. I stamped the daisy, bees and the sentiment onto white card stock and then die cut it with a Maker's Movement Stitched Rectangle die. I set that aside and then also die cut another stitched rectangle from the Gina K. Designs pattern paper. This was then mounted to a light yellow card base. I laid the white panel across it and then completed the card by adding some black glittery sprinkles from Doodlebug Designs Inc. along the top and bottom.

Whew! Mission accomplished and I am so glad I kept searching for a bee. Thanks so much for visiting and I hope your week is going well. Oh, and the weather or something is interfering with our internet and so I am getting on for just short periods. That is so frustrating. I hope I can get this post all up and running before it goes down again. Take care now.

God bless,
Verna

Saturday, June 8, 2019

Butterflies and Roses

Yesterday I used a cover plate die from Essentials by Ellen called Bed of Roses for a card and added color to it with my Life Changing Blending Brushes. I had laid it onto some Ivory card stock and I carefully held the die cut design in place and tried to use it as a stencil design on the Ivory. The idea was to get to backgrounds with one die cut. It worked great! So today here is my card featuring the stenciled design.


I die cut the panel out with the Maker's Movement single stitched rectangle stacker die. Then I stamped onto the front of the design the butterflies from Gina K. Designs Butterfly Kisses stamp set. The first layer was with Gina K. Designs Passionate Pink ink and the second addition to the butterflies was done with Versafine Onyx Black ink. I also used the black ink to stamp the big HELLO sentiment which is from the Gina K. Designs Anemone Wishes stamp set. This panel was then added to a layer of black card stock before I placed it onto an Ivory card base.

I guess I will enter this into the Double D's Challenge-Rose Garden since it fits the theme and colors. It was nice to get two cards from the one cutting of that die.

Well, have a great weekend. It is clouding up here so I am sure the rain they predicted will be an eventuality. Take care and thanks for the visit.

God bless,
Verna

Friday, June 7, 2019

Birthday Roses

Since the theme at the Double D's Challenge is Rose Garden I decided to make this birthday card using lots of roses on it. I used a die and a couple of stamp sets to make it.


I die cut the Bed of Roses cover plate from Essentials by Ellen and then sponged on some deeper pink inks to give more dimension to the design. This was placed onto a darker pink panel. I also took the sentiment from Gina K. Designs More Massive Messages and stamped that onto white card stock with black ink. I cut the white strip to the size I wanted and then layered it to a black piece of card stock and then onto the card. I stamped the roses from the Gina K. Designs A Happy Hello set, cut them out and popped that up over the top of the sentiment strip. The last thing I added was some green rhinestones. And that is my card design all completed.

Well, I hope your day is going well and I so appreciate your visits.

God bless,
Verna


Thursday, June 6, 2019

Another Father's Day Card

I think this is the last Father's Day card I will need for this year. And, to make it I pulled out an old wood mounted stamp from Tin Can Mail. I am not even sure that the company is in existence anymore. But it is quite a large stamp and being it was wood I could not get it to work in my Misti.  So I think perhaps this will be the last time I use it. I even stood up and put as much weight as I could on it and it still was not a very good printing. But since it was the third try I simply used it the way it was.


I stamped the image onto light blue card stock and then fussy cut it out and placed it onto some darker shade of blue. I also stamped the sentiment from Gina K. Designs onto the light blue and then layered that to the same darker blue. All of this was placed onto a brown card base. I added some sequins and a layered panel inside for a message and that completed my card.

This will be for another son-in-law. He is a great Dad to my grandsons. He may not be their biological father but he is still their Dad.

Well, I had another afternoon of stamping. It was fun too. Thanks for stopping in.

God bless,
Verna

Wednesday, June 5, 2019

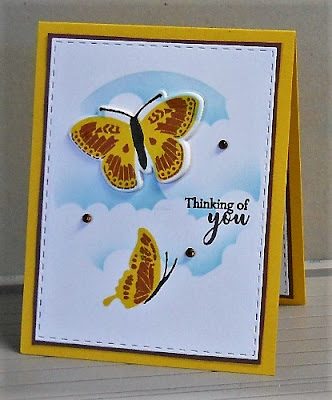
Eclipse Card

I confess I am not very well experienced with this technique but I decided to take the plunge and try it on this card. I chose not to use a word die but instead eclipsed the butterfly. The eclipse technique is what we are to use at the Mod Squad Challenge this time.


I took white card stock and then placed a medium circle stencil on the panel and then over that I took a cloud stencil and then added some clouds so that they remained within that circle area. Once I had my blue color applied for my sky I then stamped the butterflies and the sentiment onto the card. These butterflies are a two step process. I was not happy with the bodies and antennas of the butterflies being in yellow so I took an ultra fine black Bic marker and colored those areas in.  I also added the sentiment with black ink.

I then took the die that came with the stamp set and cut out the largest butterfly. I also cut out three more using white card stock. Once I had this done I took a rectangle stitched die and cut the panel and then layered it onto some brown card stock. This was all placed onto a yellow card stock base.

Now the fun part....layering all the butterfly cutouts together using some glue. Once I had all the layers glued together I then added them to the open area on the panel so that the butterfly protruded from it. I think you can see how it does that.

I also took some white card stock which was also die cut with the stitched rectangle die and layered to  brown and added that inside the card. I did not add a sentiment inside as I might just want to write a little message instead.

Supplies:
Gina K. Designs Stamp N Foil Butterfly Kisses stamp set and dies
Gina K. Designs inks
Gina K. Designs Connect Glue
Picket Fence Studios Medium Sized Circle Stencil
Picket Fence Studios Life Changing Blending Brushes
Stampenback Masking Stencil (clouds)
Maker's Movement Stitched Rectangle Stacker Die
Rhinestones (unknown)

Well, thanks for visiting and this was a fun way to spend the afternoon. Have a great evening.

God bless,
Verna

Tuesday, June 4, 2019

Thank You

I decided to make a last minute entry into Laurie's Fabulous Favorites-Framed Sentiments.  I hardly have any Thank You cards on hand and so I made one of those for the challenge. I used sponges and the Life Changing Blending Brushes to make a colorful background on my light green card base. And over that I added a sentiment panel which used a die set for the pierced look and then was cut out by  hand.


Next I proceeded to add some die cut flowers in the lower left corner. The sentiment was stamped in black.

Supplies Used:
Papertrey Ink Mix and Mat Heart Die (the sentiment panel which used the pierced design )
Impression Obsession Stitched Flower Bouquet Die
Picket Fence Studios-Thank You
Picket Fence Studios-Life Changing Blending  Brushes
Gina K. Designs Connect Glue and Tape Runner
Gina K. Designs Inks
Gina K. Designs Card Stock

Very warm here today and we made it to the 90's. And, then a few T-storms as well. It appears we have a typical summer day.

Thanks for visiting and I always love to read your comments. Some of you have "No Reply" when you comment so there is no way for me to thank you. So pretend this card is yours as my way of saying thanks. Have a great day!

God bless,
Verna

Sunday, June 2, 2019

Father's Day

The Dies R Us Challenge #122-Kids threw me for a loop until I thought about how kids play a big part in making Father's Day a big success so I went along that theme and created a card for my son-in-law who due to a TBI from an injury has some difficulties with walking and other functions. Much of the time he uses a walker but at times he will also use a wheel chair. And he is a father to a girl and a boy so with the silhouette stamp set I decided to make a scene card for him.


The first thing I did was take my blending brushes and a stencil to make a sky and grassy lawn area. That was the main background and I was then ready to stamp the silhouette images from the stamp set. But I felt it needed more so I took another stencil  and added a tree. My sentiment was stamped in black on white card stock and then die cut and layered to a layer of black card stock. I added a few gems and then placed that in the sky portion of the card. This is approximately a 5 x 7 card.

Die used:
Memory Box Cross Stitched Frame Borders

Stencils used:
Masking Stencil by Stampenback
Tree Stencil by The Greetery

Stamps:
Blue Knight Rubber Stamps Birthday Fun
Gina K. Designs sentiment from Country Roads 2 stamp set

Gems:
Hero Arts

Inks:
Gina K. Designs and Versafine

Other Supplies:
Life Changing Blending Brushes from Picket Fence Studio
My Sweet Petunia-Misti

Well, this is how I spent my Sunday afternoon. I hope your Sunday was a good one and that the new week will be a fantastic one as well. I love your visits too!

God bless,
Verna

Saturday, June 1, 2019

Succulent Garden

Shortly before Mother's Day I got an order from The Greetery and among the goodies was this set of succulent dies. So yesterday I finally pulled them out and proceeded to make a few of the succulents up to put on my garden card. I must say I am very happy with them. When I used to have a flower bed I had a few in my garden and we called them Hens and Chicks and this is what this garden scene reminds me of. I hope you will enjoy my little simple garden too.


I used the Life Changing Blending Brushes and some of Gina K. Designs inks to make the background  and also to add color to my succulent dies. I hope I assembled them correctly. But they looked quite good to my way of thinking. The last thing I did was to stamp the sentiment which is from The Greetery as well and is from the Comforting Commands stamp set.

I am entering this in the Word Art Wednesday Challenge #388-#389.

I hope your weekend is going great. I love all the comments you leave too.

God bless,
Verna

More Coffee

More goodies arrived in the mail this week and I have been playing with them and in the process created this coffee themed card. Therefore I will be entering this into the Mod Squad Challenge-Tea or Coffee.


The cup die is from Picket Fence Studios as is the stencil called Down To The Last Drop. I used Gina K. Designs inks to add color to the stencil and then also some distressing on the cup. The stenciled design was shifted just a shade to create a shadow. The Life Changing Blending Brushes from Picket Fence Studios was used for those processes. The sentiment and the coffee beans are from the Gina K. Designs Perfect Blend stamp set. And the stitched rectangle die used to cut the panel on the outside and inside is from Maker's Movement (formerly Cheery Lynn Designs).

Thanks for checking in and for all the wonderful comments.

God bless,
Verna

Fluttering By

 First of all I want to wish all my Canadian friends a Happy Canada Day! I hope your day is extra special. This card I am showing uses an Al...