Have a fun fright night with trick or treat people or going to parties. Hubby and I are just hanging out at home and just in case, we do have some treats if someone should drop by.
By the way I forgot to leave an open area for the moon when I made this a couple weeks ago so I instead took one of the round sponge daubers and dipped it in bleach, blotted it off a bit and then with that dauber lifted off the color to reveal a moon. The pumpkin and crow die is from Cheapo Dies and the tree is from Diemond Dies. The witch stamp is from Frogs Whiskers.
Have a fun Halloween!
God bless,
Verna
This blog is about my card making, but now and then I might add a few other things as well. Please read the Privacy Policy at the top of my blog. Also any handmade items I display are mine exclusively and so therefore do not publish them as your own without my permission. I would be honored though if you would like to CASE, Like or Pin them and give me the credit.
Wednesday, October 31, 2018
Monday, October 29, 2018
Red Star
I always struggle with a solid image when trying to make it look fantastic in color. Well, the other day I saw this video by Jasmine Burgess who showed an easier way for me to do a more solid image by using second generation stamping. She did her design with a brush and water color paints but for mine I decided to stamp my image with a Memento ink and use Copics.
My subject matter was the beautiful Penny Black slapstick cling stamp called Red Star. I used a brown ink to do my second generation stamping of the image and I also used my MISTI. The card stock I used was the white base weight from Gina K. Designs. That is thick enough that the Copics don't bleed through it. So by using that I was able to do it directly to my card without having to add more layers. The sentiment is also from this stamp set. I did use a bit of white paint pen to fill in some of the highlights.
I found that using the Copics instead of water colors is much easier for me to do then it is with a paint brush. Also my card stock will not ripple like it does with using water colors. To finish the card I simply added a few rhinestones to the center of the poinsettia.
Well, I don't know what you think but I am loving the look and the new way of using these solid stamps. This has always been one of my favorite Penny Black ones so I am glad I found an easier way to work with it and other solid images as well.
I am entering this in the Penny Black Creative Christmas Challenge.
Thanks so much for coming by to visit and for all the wonderful comments. I hope your week is off to a great start.
God bless,
Verna
Sunday, October 28, 2018
Little Elf Ava
This afternoon I played with another Penny Black stamp design called Little Elf Ava. I think she is such a cute little elf and so therefore she is holding a star in which I added the word Joy as she looks to be a joyful little one.
Thanks for joining me and leaving your wonderful comments. I read all of them.
God bless,
Verna
Copics were used to color the image. The Joy comes from another Penny Black stamp set called Peaceful Winter and is stamped in dark green ink. I had to find a small enough sentiment to put into the star sign. And, to dress the star up a bit I added some green rhinestones to match the stamped sentiment. The panel was die cut using the Out of the Box Technique so that it appears that the fluffy ball of her hat is outside the inner panel. The scalloped stitched dies used to cut the panels are from an Unbranded set.
I am entering this card in the Penny Black Creative Christmas Challenge.
Thanks for joining me and leaving your wonderful comments. I read all of them.
God bless,
Verna
Friday, October 26, 2018
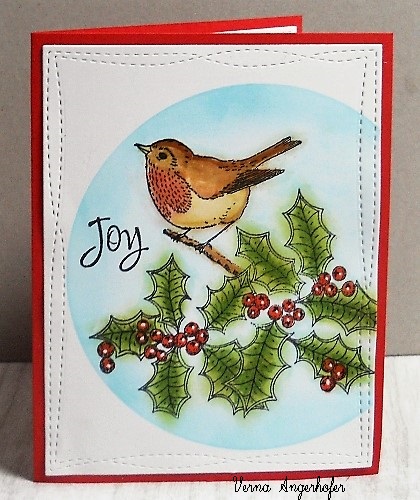
Holly Robin Christmas
I was cleaning off my crafting end of the kitchen table when I ran across this darling Penny Black design called Nature's Best. I also used part of a Penny Black sentiment from another set called Caroling Penguins. I thought the Joy from the sentiment would be perfect for this CAS design.
I stamped the design on white card stock with Memento black ink and then took the stencil from Picket Fence Studios and used my Life Changing Blender Brushes to fill in the background around the bird and holly image in a light blue. Then with a combination of Copics and sponging I finished coloring the rest of the design. This panel was then die cut with a MFT Di-namics Wonky Stitched Rectangle Stacker die and then added to a red card base. To finish the card I took a white paint pen and added just a dot to each berry to make it look like it was shiny. And, of course, I added a white panel inside so I could write or stamp a message.
I am entering this in the Penny Black Creative Christmas Challenge.
Thanks for visiting and I wish you a great weekend.
God bless,
Verna
Thursday, October 25, 2018
Give Thanks
I made this card for the Mod Squad Challenge in which we are to make a Fall card and use the word Thanks on it. For my card I chose images and a sentiment from the Gina K. Designs The Simple Things stamp set.
I did some masking to make the scene. And, the focal panel was die cut with a MFT Di-namics Wonky Stitched Rectangle Stacker die. All inks used were from Gina K. Designs except for the pumpkin which was done with Memento black ink. The pumpkin was colored in with Copic markers. After adding the sentiment I then put in a corner design of black rhinestone gems below it. This panel was then added to the card base. Although it is not visible I added a white panel inside the card as well so that a message can be written or stamped.
I thank you for the visit and for all the lovely comments. Until next time you take care.
God bless,
Verna
October Rudolph Days
Oh, my! How fast the month goes by! So hard to believe that it is time for the October Rudolph Days Challenge. Well, I am prepared though and am featuring snowflakes in abundance for my card entry.
I chose to use the wonderful snowflakes from the Gina K. Designs Sparkling Snowflake stamp set which is one of the sets in the current Fruit of the Season TV kit. I also used a large Noel die cut which was a gift to me and I am pretty sure it is a Crafty Cuts die as I found the design on the internet with a search engine. It is cut with sparkly blue glitter paper.
The snowflakes were all embossed with white embossing powder using a Versamark ink pad and some Gina K. Designs embossing powder. Then I took some Gina K. Designs Blue Raspberry ink and added some color with my new Life Changing Blender Brushes that I got from Picket Fence Studios. I really like them. The last thing that was added to the card was some rhinestone gems.
While I had that stamp set out I also made an ornament. I used the big snowflake for that design. It was embossed in gold and then die cut with the dies the matching ones that came with the kit. I made it so that the stamped and embossed design showed up on both sides of it.
And I decided that I wanted to see if it would work on some purple vellum with which I made a sleeve for a battery operated votive candle. This time I embossed the flakes in silver embossing powder from Gina K. Designs.
I liked the votive candle look too, but I need to buy new candles as the battery in mine is nearly done in. LOL But I think you get the idea.
Well, that is my post for this morning. I hope you like all the snow I have been playing with. I know I sure had fun making these projects. Thanks for the visit and I hope your day is a good one.
God bless,
Verna
Tuesday, October 23, 2018
Ornament Card
Hello everyone. I hope you are having a great afternoon. My hubby had to travel out of town so I worked on a few cards and I wanted to share one I made with the Gina K. Design Holly Jolly stamp and die combo set.
This is a two step set and was made to go with some foiling supplies but I chose to use it simply as a stamp and die set. Now I am not all that great making two step designs and I was a bit off kilter with this one too. But I took some markers and filled in the white gaps and therefore it is not so noticeable. All the stamps used are from that stamp set but I only chose to die cut the ornament. Originally I had planned a much bigger panel but just at the last minute I messed up a perfect design with an ink blotch which would not erase with the Tombo sand eraser. So I did the next logical step and cut the panel down. I layered it onto some Slate card stock and then to the Blue Raspberry card base. I also added a panel of white inside the card. The last items added were the gems to the ornament.
Oh, and I tried to get the illusion of the light bulbs shining by doing just a smidge of sponging with the same color of ink. One has to do this very lightly so I was glad with the new sponging brushes I recently got that it worked so well. I also added a little white gel pen on the bulbs to make them have some highlights.
Well, time to get back to reality and do the dirty dishes. I best have them all done before the hubby gets home or he will know I was goofing off all day. LOL Thanks for visiting and have a great evening.
God bless,
Verna
Subscribe to:
Posts (Atom)
Fluttering By
First of all I want to wish all my Canadian friends a Happy Canada Day! I hope your day is extra special. This card I am showing uses an Al...
-
I had to make a card using a coffee theme today as it is my favorite beverage. Even in summer. I even like iced coffee! So with that in mind...
-
Well, I am so happy that I tried something other then a card for this 2017 Winter Coffee Blog hop . It took a bit of learning to do it but I...
-
For my final card for the 2017 Summer Coffee Lovers Hop I thought it only fitting to make one with a more patriotic theme in celebration of...